Parking lot design and layout is the process of sizing stalls, dimensioning aisles, grading drainage slopes, and specifying pavement materials so a lot maximizes capacity while remaining safe, accessible, and durable. Each decision affects every other; stall width dictates aisle clearance, drainage slope shapes grading and inlet placement, and asphalt mix selection determines how long those grades hold.
This guide covers stall sizing and layout geometry, aisle widths and traffic circulation, ADA-accessible parking compliance, drainage engineering, asphalt paving specifications, climate and soil considerations, striping and signage, safety and user experience design, and lifecycle maintenance planning.
Standard stalls measure 9 feet wide by 18 to 19 feet deep for perpendicular parking, while compact, oversized, and van-accessible spaces each require distinct dimensions. Angled layouts reduce aisle width needs but consume more curb length, making 90-degree configurations the highest-capacity option for large commercial sites.
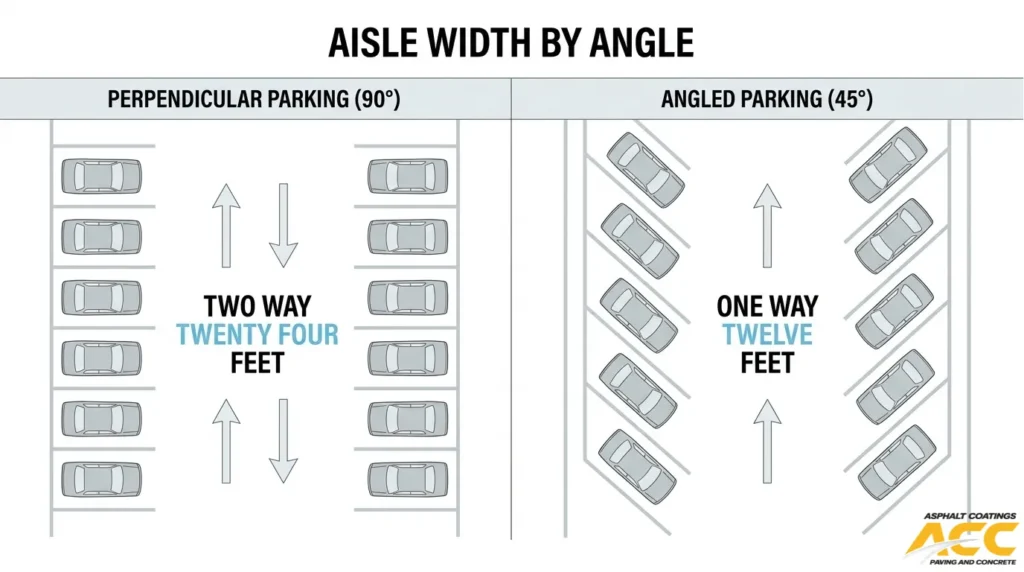
Two-way drive aisles require a minimum of 24 feet; one-way aisles paired with angled stalls can narrow to 12 to 14 feet. Fire lanes, delivery routes, and ADA access aisles each impose additional width and clearance thresholds that override standard minimums.
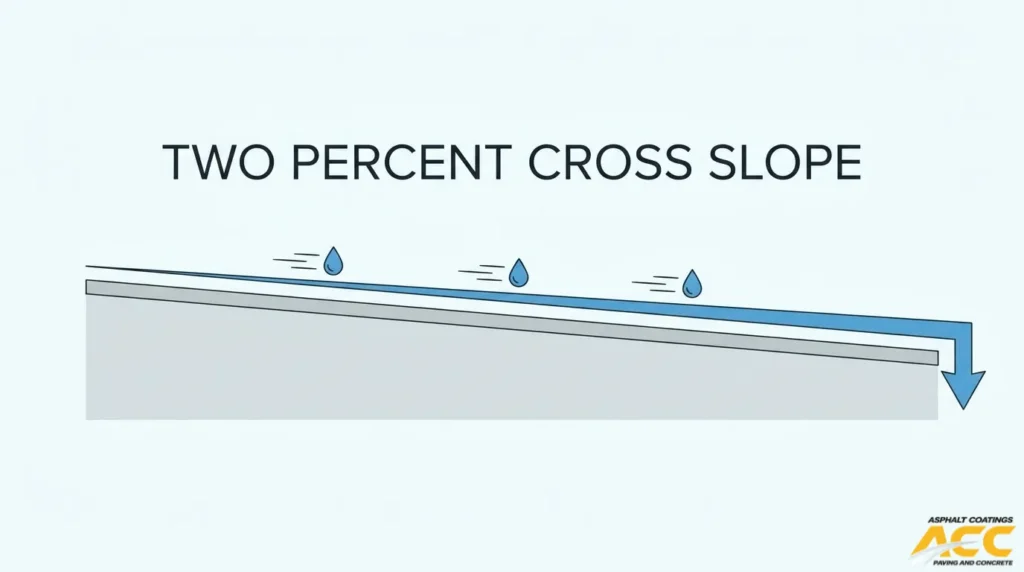
A 2% cross slope is the recommended baseline for moving water off pavement surfaces, and longitudinal slopes below 0.5% invite ponding that accelerates structural failure. Proper inlet placement, catch basin grading, and climate-responsive slope adjustments protect the pavement from within.
Asphalt lift thickness must equal at least three times the nominal maximum aggregate size, compaction must finish before the mix cools below 180°F, and base layers need moisture-insensitive materials with adequate bearing capacity. In freeze-thaw climates, frost depth, UV intensity, and de-icing chemical exposure further shape every material and thickness decision.
Scheduled crack sealing, sealcoating, and overlays extend pavement life by decades when timed correctly; skipping a single cycle compresses the timeline toward full reconstruction.
What Are the Key Goals and Constraints in Parking Lot Design and Layout?
The key goals and constraints in parking lot design and layout center on maximizing usable space, ensuring safe traffic flow, meeting code requirements, and building a pavement structure that withstands local conditions. Every design decision involves trade-offs between capacity, accessibility, drainage performance, and long-term durability.
Parking lot design balances several competing priorities. Each stall added increases capacity, yet narrower aisles or undersized stalls create maneuvering difficulties that raise collision risk. According to NHTSA data, parking lot and driveway-related crashes represented 15% to 25% or more of all reported pedestrian crashes in several studies. That statistic underscores why dimensional standards, clear circulation patterns, and pedestrian separation are not optional refinements; they are safety imperatives baked into the design from day one.
The primary design goals include:
- Space efficiency: Fitting the maximum number of compliant stalls within the available footprint while preserving adequate aisle widths and drive lanes.
- Traffic flow and safety: Establishing clear one-way or two-way circulation, separating pedestrian paths from vehicle routes, and positioning entrances at least 100 feet from signalized intersections.
- ADA and code compliance: Meeting federal accessible-parking ratios, dimensional minimums, and local zoning ordinances that dictate stall counts per land use.
- Drainage and pavement longevity: Grading surfaces to a minimum 2% cross slope so water sheds before it saturates the subgrade or causes ponding.
- Constructability and lifecycle cost: Specifying asphalt mix designs, base depths, and compaction standards that match anticipated traffic loads and regional climate stresses.
Constraints narrow the designer’s options at every stage. Site geometry, utility easements, and setback requirements limit where stalls and drive lanes can go. Fire codes require unobstructed access roads at least 20 feet wide with 13 feet 6 inches of vertical clearance, which often dictates primary lane dimensions before parking layout even begins. Soil bearing capacity, frost depth, and exposure to freeze-thaw cycles or UV radiation further constrain pavement thickness and material selection.
For commercial properties, these goals and constraints are inseparable. A layout that maximizes stall count but ignores drainage slope will produce ponding, accelerated pavement failure, and expensive repairs within just a few years. Conversely, over-engineering the pavement structure without optimizing stall geometry wastes capital on unnecessary material. The most effective parking lot designs treat dimensional standards, traffic planning, drainage engineering, and paving specifications as interconnected systems rather than isolated checklist items.
How Do You Determine the Right Parking Lot Stall Size for Your Property?
You determine the right parking lot stall size by matching vehicle classification, property use, local code minimums, and parking angle to your specific site conditions. The following subsections cover compact versus standard versus oversized dimensions, property-type adjustments, ADA and code requirements, and the impact of angled layouts.
How Do Parking Stall Size Requirements Differ Between Compact, Standard, and Oversized Vehicles?
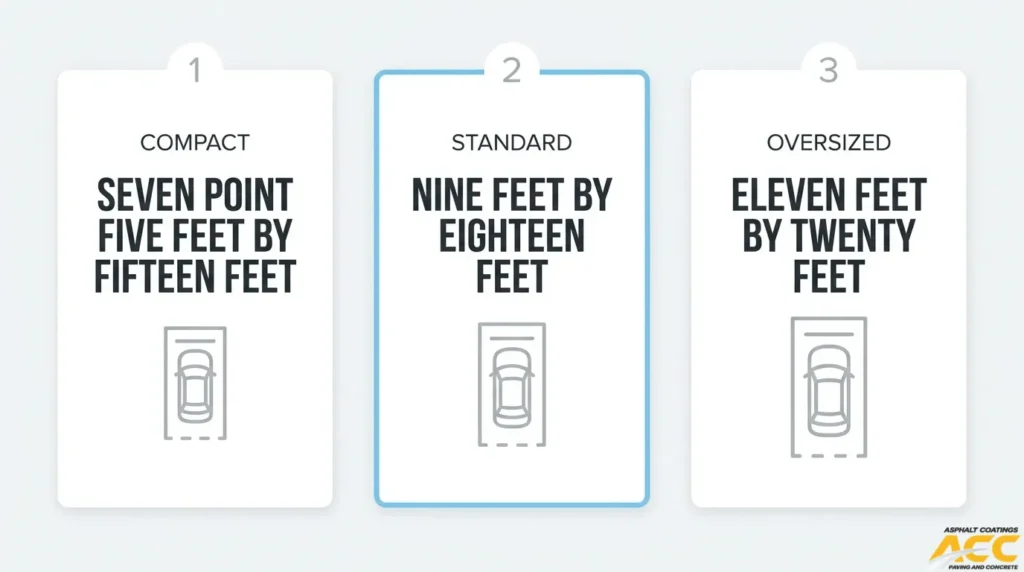
Parking stall size requirements differ between compact, standard, and oversized vehicles primarily in width and depth dimensions.
- Compact stalls typically measure 7.5 to 8 feet wide by 15 to 16 feet deep, suitable for sedans and small SUVs.
- Standard stalls measure 9 feet wide by 18 to 19 feet deep, accommodating midsize trucks and full-size sedans.
- Oversized stalls range from 10 to 11 feet wide by 20 feet or deeper, serving full-size pickups and large SUVs.
According to the University of Houston Campus Design Guidelines, drives that do not allow parking within the right-of-way require 24 feet for two-way traffic, which directly influences how stall depth interacts with aisle design. Undersizing stalls for the actual vehicle mix on your property creates door-ding complaints and circulation bottlenecks, so surveying the fleet your tenants and visitors actually drive is worth the effort before finalizing dimensions.
How Should Parking Stall Sizes Change for Retail Centers Versus Multifamily and Industrial Properties?
Parking stall sizes should change for retail centers versus multifamily and industrial properties based on turnover rate, vehicle type, and user behavior.
- Retail centers benefit from wider stalls (9 to 9.5 feet) because high turnover means frequent door openings, shopping carts, and distracted pedestrians.
- Multifamily properties can use standard 9-foot stalls since residents learn their spaces, though visitor areas still warrant extra width.
- Industrial properties need oversized stalls of 10 to 12 feet wide, plus dedicated tractor-trailer spaces. Where tractor-trailer parking is proposed, spaces should measure a minimum of 12 feet wide by 50 feet long.
Mixing stall sizes within a single lot is a practical strategy; compact stalls near building entries serve quick stops, while oversized stalls along perimeters handle larger vehicles without choking drive aisles.
How Do Local Codes and ADA Requirements Influence Minimum Stall Dimensions?
Local codes and ADA requirements influence minimum stall dimensions by setting mandatory width, depth, and access-aisle standards that override any site-specific preference.
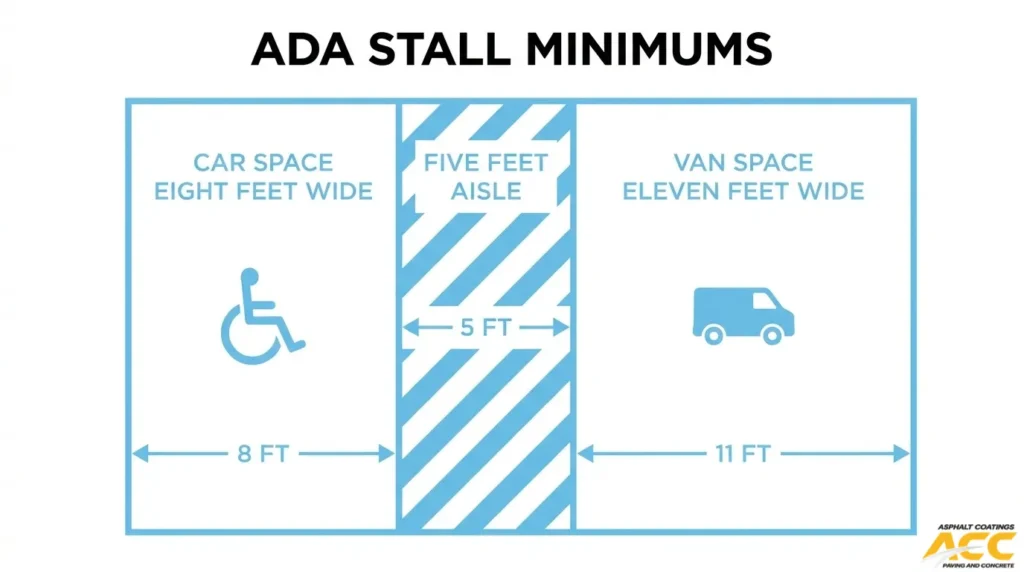
Most municipal zoning ordinances specify minimum stall widths between 8.5 and 9 feet, with depths of 18 to 19 feet for perpendicular parking. ADA Standards for Accessible Design add a separate layer: car parking spaces require a 96-inch (8-foot) minimum width, while van-accessible spaces require 132 inches (11 feet) with an adjacent 60-inch access aisle. Van-accessible spaces can alternatively be 96 inches wide if paired with a 96-inch access aisle. Always verify your jurisdiction’s code first, because local amendments frequently exceed federal ADA minimums for stall count thresholds and signage height.
How Do Angled Parking Stalls Affect Effective Stall Length and Width Compared With 90-Degree Stalls?
Angled parking stalls affect effective stall length and width by reducing the perpendicular depth vehicles project into the drive aisle, which narrows required aisle widths but increases the overall row footprint along the curb line.
According to Henderson County, North Carolina parking placement standards, angled parking spaces require a minimum design vehicle footprint of 9 feet wide by 19 feet long, while parallel spaces require 9 feet by 22 feet. At 45 or 60 degrees, the stall’s effective depth shrinks compared to a 90-degree layout, allowing aisle widths as narrow as 12 to 14 feet for one-way flow. However, each angled stall consumes more linear curb length than a perpendicular stall, so total lot capacity often decreases.
For properties with constrained lot widths, angled layouts improve maneuverability; for maximum space count on large sites, 90-degree stalls paired with 24-foot two-way aisles remain the most efficient configuration. With stall sizes established, the next step is selecting the correct aisle widths for your chosen parking angle.
How Wide Should Parking Lot Aisles Be for Different Stall Angles and Vehicle Types?
Parking lot aisle widths should range from 12 feet for one-way angled configurations to 24 feet or more for two-way 90-degree layouts and fire access routes. The sections below cover specific widths for perpendicular parking, angled stalls, truck and fire-lane access, and one-way versus two-way traffic patterns.
What Aisle Widths Are Recommended for 90-Degree Parking in Commercial Lots?
The recommended aisle widths for 90-degree parking in commercial lots are 24 feet for two-way traffic and a minimum of 20 feet for restricted one-way flow. A standard perpendicular parking module measures 60 feet total: two 18-foot-deep stalls flanking a 24-foot drive aisle, according to Urban Land Institute design guidance. This 24-foot dimension allows full-size sedans and SUVs to complete a three-point turn into a head-in stall without encroaching on adjacent vehicles. Narrowing a 90-degree aisle below 24 feet forces tighter turning radii that increase fender contact, slow circulation, and frustrate drivers during peak hours. For most commercial lots, treating 24 feet as the baseline prevents costly restriping later.
How Do Recommended Aisle Widths Change for 45-, 60-, and 75-Degree Angled Parking?
Recommended aisle widths decrease as the parking angle decreases because shallower stall angles require less turning clearance:
- 45-degree stalls typically need aisles of 12 to 14 feet (one-way only).
- 60-degree stalls generally require 16 to 18 feet of aisle width.
- 75-degree stalls call for 20 to 22 feet, approaching 90-degree dimensions.
According to the City of Covington Municipal Code (§18.50.110), regardless of parking angle, one-way aisles must be at least 10 feet wide and two-way aisles at least 20 feet wide. Accessible access aisles add further requirements; the U.S. Access Board (§502.3) mandates a minimum 60-inch-wide access aisle adjacent to each accessible space, with surfaces sloped no steeper than 1:48. Selecting the right angle-to-aisle pairing lets designers balance space efficiency against safe maneuverability.
How Should Aisle Widths Adjust for Truck, Delivery, and Fire-Lane Access?
Aisle widths for truck, delivery, and fire-lane access should exceed standard passenger-vehicle minimums to accommodate larger turning radii and emergency equipment. The 2021 International Fire Code requires fire apparatus access roads to maintain an unobstructed width of at least 20 feet with a vertical clearance of 13 feet 6 inches. Delivery and loading aisles often need 26 to 30 feet when tractor-trailers must make 90-degree turns.
Key width benchmarks for larger vehicles include:
- Van-accessible spaces: 8-foot stall with an 8-foot access aisle, per Massachusetts disability parking regulations.
- Tractor-trailer lanes: 26 to 30 feet of clear aisle width for turning.
- Fire lanes: 20 feet minimum, kept clear of parked vehicles and dumpsters at all times.
Undersizing these aisles risks blocked emergency response and damaged curbs from trailer overhang.
How Do One-Way Versus Two-Way Traffic Patterns Affect Required Aisle Width?
One-way traffic patterns reduce required aisle width because vehicles only need clearance for a single direction of travel, while two-way patterns demand wider aisles for opposing movements. According to the University of Houston Campus Design Guidelines, drives without adjacent parking require 24 feet for two-way traffic and 12 feet for one-way traffic. The City of St. Helena standards specify slightly wider parking-aisle minimums: 24 feet for two-way and 14 feet for one-way.
One-way aisles paired with angled stalls maximize stall count on tight sites, but they demand clear directional arrows and consistent signage to prevent wrong-way entry. Two-way aisles sacrifice density for intuitive wayfinding; most first-time visitors navigate a two-way grid with fewer errors. Choosing between the two is ultimately a trade-off between total space count and circulation simplicity.
With aisle dimensions established, the next step is selecting the best stall angle for your lot’s shape and traffic volume.
How Should You Choose Between 90-Degree, Angled, and Parallel Parking Layouts?
You should choose between 90-degree, angled, and parallel parking layouts based on available lot depth, expected traffic volume, and the turning clearance your vehicles need. Each layout suits different site constraints and user profiles.
When Is 90-Degree Parking the Best Choice for a Commercial Parking Lot?
90-degree parking is the best choice for a commercial parking lot when maximizing stall count per linear foot of aisle is the priority. Perpendicular stalls pack the most vehicles into a given area because cars park straight in, eliminating the wasted triangular space that angled layouts create.
This configuration works best in lots with sufficient depth. According to Urban Land Institute guidance, a standard perpendicular module measures 60 feet wide, consisting of two 18-foot-deep stalls flanking a 24-foot two-way drive aisle. Two-way aisle compatibility is a key advantage; drivers can approach from either direction, simplifying circulation in large retail and office park lots.
The trade-off is maneuverability. Drivers need the full 24-foot aisle to back out safely, which can slow peak-hour throughput compared to angled alternatives.
When Do Angled Stalls Improve Traffic Flow and User Experience?
Angled stalls improve traffic flow and user experience when a lot uses one-way circulation and serves high-turnover destinations like retail storefronts or medical offices. Parking at 45, 60, or 75 degrees lets drivers pull into stalls with a shallower turning arc, reducing the backup maneuver that causes congestion in perpendicular layouts.
One-way aisles paired with angled stalls can be narrower, sometimes as little as 10 to 14 feet depending on local code and stall angle. This narrower aisle width partially offsets the space lost to the angled footprint, making the layout competitive on total capacity while improving driver comfort.
For properties with frequent visitor turnover, angled parking is often the strongest balance between capacity and ease of use.
When and Where Should Parallel Parking Be Used in a Parking Lot Layout?
Parallel parking should be used in a parking lot layout along perimeter drives, narrow access roads, or fire lanes where full-depth stalls would encroach on required clearances. According to Henderson County, North Carolina code, parallel spaces require a minimum footprint of 9 feet wide by 22 feet long, making them longer per stall than perpendicular spaces but much shallower in overall module depth.
Common applications include:
- Internal loop roads too narrow for angled stalls.
- Frontage areas adjacent to building entries where pedestrian zones limit lot depth.
- Overflow zones along secondary drive lanes.
- Sites requiring tractor-trailer access, where the County of San Diego Parking Design Manual recommends stalls at least 12 feet wide by 50 feet long.
Parallel parking yields the fewest spaces per linear foot of curb, so it should supplement, not replace, a primary 90-degree or angled layout.
With the right layout selected, designing efficient traffic flow through entrances, exits, and main drive lanes becomes the next step.
How Do You Plan Efficient Traffic Flow, Entrances, and Exits in a Parking Lot?
You plan efficient traffic flow, entrances, and exits by designing clear drive lanes, strategically locating access points, and separating pedestrian paths from vehicle routes. The following subsections cover circulation patterns, access control placement, and pedestrian-vehicle separation.
How Should You Lay Out Main Drive Lanes and Circulation Patterns to Reduce Conflicts?
You should lay out main drive lanes and circulation patterns by establishing a clear hierarchy of movement that separates entering traffic from internal parking maneuvers. According to the Georgia Department of Transportation’s Regulations for Driveway and Encroachment Control Manual, the distance between roadway traffic and the first internal movement shall be a minimum of 200 feet; lots less than 500 feet deep should maintain a minimum distance of 100 feet.
This throat distance gives drivers time to transition from road speed to parking-lot speed before encountering cross-traffic or turning vehicles. Two-way drive lanes require a minimum width of 24 feet, while one-way lanes need at least 12 feet. Placing the primary circulation loop around the lot perimeter, with secondary aisles feeding inward, creates a predictable flow that reduces head-on conflicts and wrong-way driving.
Where Should Entrances, Exits, and Access Control Be Located for Safety and Capacity?
Entrances, exits, and access control should be located to maximize sight distance and minimize interference with public road traffic. N.J. Admin. Code § 16:47-3.8 requires a minimum of 100 feet between all driveways and signalized intersections.
Separating entrance and exit driveways prevents opposing turn movements from stacking into the street. Right-in, right-out configurations work well on high-speed corridors where left turns would create hazards. Gates, ticket dispensers, and card readers should be set back far enough from the curb cut so queuing vehicles do not block the sidewalk or travel lane. For lots serving high-turnover retail, providing at least two access points on different street frontages distributes peak-hour demand and prevents single-point congestion.
How Can You Separate Pedestrian Paths and Loading Zones From Vehicle Traffic?
You can separate pedestrian paths and loading zones from vehicle traffic by dedicating distinct circulation areas for each user type. According to the Oxnard, California Code of Ordinances (SEC. 16-644), loading spaces shall be located so commercial vehicles shall not back into a public street or alley.
Placing loading docks along the building’s rear or side, away from customer parking, eliminates the most dangerous conflict point between large trucks and pedestrians. Raised sidewalks, painted crosswalks, and bollard-protected walkways should connect parking rows directly to building entrances without forcing pedestrians to walk along active drive aisles. Landscaped islands double as pedestrian refuge points at longer crossings. For most commercial lots, dedicating loading zones to off-peak delivery windows further reduces the overlap between truck movements and foot traffic.
With traffic flow and access points defined, designing compliant accessible parking ensures every user reaches the building safely.
How Should You Design Accessible Parking to Meet ADA and Local Accessibility Codes?
You should design accessible parking by following federal ADA Standards for Accessible Design alongside any stricter state or local accessibility codes. The subsections below cover required space counts, dimensional and striping specs, and access aisle alignment with building entrances.
How Many Accessible Parking Spaces Are Required for Different Lot Sizes?
The number of accessible parking spaces required for different lot sizes follows a graduated scale set by ADA standards. Lots with 1 to 25 total spaces need one accessible space, while larger lots increase proportionally. According to the U.S. Department of Justice, at least one of every six accessible spaces must be van accessible. Signage is equally regulated: signs identifying van-accessible spaces must display the “van accessible” designation and be mounted on a post at least 60 inches above the ground surface, measured to the sign’s bottom edge. Skipping even one required space or sign risks code violations and costly retrofits, so verifying counts against your jurisdiction’s table before striping begins is essential.
What Are the Dimensional and Striping Requirements for Accessible and Van-Accessible Stalls?
The dimensional and striping requirements for accessible and van-accessible stalls are defined by ADA Standards for Accessible Design. Standard car-accessible spaces must be 96 inches (8 feet) wide minimum, with an adjacent access aisle at least 60 inches wide. Van-accessible spaces must be 132 inches (11 feet) wide minimum, or 96 inches wide if paired with a 96-inch-wide access aisle. Access aisles must run the full length of the parking space and be clearly striped to discourage parking. Surface slopes within both stalls and aisles cannot exceed 1:48 in any direction. For most commercial lots, using a universal design (11-foot stalls with 5-foot aisles) simplifies striping layout and reduces future re-marking when space ratios change.
How Should Access Aisles, Ramps, and Routes Be Aligned With Building Entrances?
Access aisles, ramps, and routes should be aligned to create the shortest possible accessible path between van-accessible stalls and the building entrance, with no steps or abrupt level changes along the route. According to the Texas Accessibility Standards, parking spaces for vans and their associated access aisles and vehicular routes must provide a vertical clearance of 98 inches minimum. Ramp slopes along the accessible route must not exceed 1:12, and cross slopes must stay within 1:48. Positioning accessible spaces nearest the entrance eliminates unnecessary travel distance across drive aisles where vehicle-pedestrian conflicts occur. Proper alignment at the paving stage also ensures compaction quality is maintained across transitions, since all rolling must be completed before the asphalt mix cools below 180°F.
With accessible parking designed to code, the next consideration is how drainage slope protects that pavement investment over time.
How Do You Design Parking Lot Drainage Slope to Prevent Ponding and Pavement Damage?
You design parking lot drainage slope by combining cross slopes, longitudinal grades, and inlet placement to move water off the pavement surface before it ponds. The sections below cover recommended slope percentages, catch basin design, drive lane drainage, and climate considerations.
What Longitudinal and Cross Slopes Are Recommended for Asphalt Parking Lots?
The recommended longitudinal and cross slopes for asphalt parking lots fall within narrow ranges that balance drainage efficiency against driver comfort. According to the Texas Department of Transportation Roadway Design Manual, the recommended pavement cross slope for usual conditions is 2 percent, and cross slopes on all roadways should not be less than 1 percent.
Longitudinal grade matters just as much. The Iowa Department of Transportation Design Manual notes that longitudinal slopes less than 0.5% can result in ponding and the accumulation of debris on curbed roadways and in areas without adequate cross slope.
Key minimums to specify:
- Cross slope should be 2% under normal conditions, never below 1%.
- Longitudinal slope should be at least 0.5% to prevent standing water.
- Transition areas between slope changes need particular attention, since superelevation zones often lack adequate cross fall.
From a practical standpoint, designing to exactly the minimum invites problems. Asphalt settles over time, and even minor construction tolerances can reduce effective slope below the threshold where water moves reliably.
How Should Slopes Be Designed Around Catch Basins, Inlets, and Low Points?
Slopes around catch basins, inlets, and low points should be graded to funnel stormwater toward collection structures without creating flat zones where sediment accumulates. According to the Washington State Department of Transportation Hydraulics Manual, catch basins are designed to retain sediment and debris transported by stormwater into a storm sewer system, and they include a sump for collection of sediment and debris.
Effective grading practices around these structures include:
- Maintaining a consistent slope toward each inlet from all surrounding pavement.
- Placing inlets at true low points rather than relying on surface drainage to find them.
- Avoiding abrupt grade breaks that trap water upstream of the structure.
Depressed grate inlets perform best when the surrounding pavement slopes at least 1% toward the opening on every side. Flat spots near inlets are one of the most common causes of premature pavement failure in commercial lots.
How Do You Handle Drainage on Long Drive Lanes, Loading Areas, and Entrances?
You handle drainage on long drive lanes, loading areas, and entrances by breaking these areas into manageable drainage segments with intermediate collection points. Long, continuous pavement runs concentrate stormwater volume, which increases flow velocity and erosion potential at downstream inlets.
Loading areas present a unique challenge because heavy truck traffic compresses the pavement surface over time, creating depressions that trap water. Per the Oxnard, California Code of Ordinances (SEC. 16-644), loading spaces must be located so commercial vehicles do not back into a public street, which often positions them at interior lot areas where drainage must be self-contained.
Practical approaches for these zones:
- Install trench drains across loading dock aprons to intercept sheet flow.
- Crown long drive lanes at center and slope both edges toward curb inlets.
- Grade entrance throats to drain inward toward the lot, preventing runoff from reaching the public right-of-way.
How Does Climate, Snowmelt, and Freeze-Thaw Activity Affect Drainage Design Choices?
Climate, snowmelt, and freeze-thaw activity affect drainage design choices by increasing the volume and timing of runoff while also degrading the pavement structure from within. In regions with repeated freeze-thaw cycles, water that ponds even briefly can infiltrate cracks, freeze, expand, and widen those cracks into potholes or alligator patterns.
Snowmelt creates sustained, low-volume runoff that conventional storm drainage may not capture efficiently because flows are too shallow to reach inlet grates. Design responses include:
- Specifying steeper minimum slopes (closer to 2.5% cross slope) to keep meltwater moving.
- Using moisture-insensitive, free-draining base and subbase materials that prevent trapped water from freezing beneath the surface.
- Positioning snow storage areas at lot perimeters where meltwater drains away from traffic lanes.
In freeze-thaw climates, drainage design is not optional detailing; it is structural protection. Every fraction of a percent of additional slope pays dividends in pavement longevity.
With drainage slopes properly established, the paving specification itself determines how well those grades hold up over time.
What Should Be Included in the Asphalt Parking Lot Paving Specification?
The asphalt parking lot paving specification should include asphalt mix design, layer thickness, base and subgrade preparation, compaction requirements, joint detailing, and surface tolerances. The following subsections cover each component.
How Do You Select the Appropriate Asphalt Mix and Layer Thickness for Different Traffic Loads?
You select the appropriate asphalt mix and layer thickness by matching aggregate size, binder grade, and lift depth to projected traffic volume and vehicle weight. Light-duty passenger lots typically use a finer Superpave mix with thinner lifts, while heavy-duty areas serving trucks require coarser aggregate and thicker structural sections.
Lift thickness must equal at least three times the nominal maximum aggregate size so aggregates align properly during compaction and the finished mat remains impermeable. According to the California Department of Transportation Construction Manual, if the total layer thickness is at least 0.15 foot, the contractor is required to conduct density testing, and no single HMA lift should be broken below 0.15 feet. Specifying mix type and minimum lift thickness by traffic zone prevents premature rutting in high-load areas while avoiding over-design in low-traffic zones.
What Base, Subbase, and Subgrade Preparation Requirements Belong in the Paving Spec?
Base, subbase, and subgrade preparation requirements that belong in the paving spec include material gradation, compaction density targets, moisture conditioning, and proof-rolling criteria. Every layer beneath the asphalt surface transfers and distributes vehicle loads to the native soil; poor preparation at any level leads to settlement, cracking, and premature failure.
According to the Federal Highway Administration, pavement geotechnical design must focus on selecting moisture-insensitive free-draining base and subbase materials, stabilizing moisture-sensitive subgrade soils, and providing adequate drainage for any water that infiltrates the pavement system. Specifications should call out minimum California Bearing Ratio values, maximum allowable moisture content, required compaction percentages for each layer, and undercutting protocols when unsuitable soils are encountered. Including these details upfront eliminates ambiguity during construction and protects the pavement’s structural integrity for decades.
How Should Compaction, Joints, and Mat Thickness Be Specified for Longevity?
Compaction, joints, and mat thickness should be specified with clear temperature windows, density targets, and joint construction methods to maximize pavement longevity. Poorly compacted asphalt permits air and water infiltration that accelerates oxidation and stripping.
Key specification items include:
- Rolling temperature window: Compaction should begin at the highest temperature that avoids surface damage and finish before the mix cools below 180°F.
- Target density: Specify a minimum percentage of theoretical maximum density, typically 92% to 96%, verified by nuclear gauge or core sampling.
- Maximum lift thickness: Static steel-wheeled rollers can properly compact lifts up to three inches; thicker placements require vibratory or pneumatic equipment.
- Longitudinal and transverse joints: Require staggered joint offsets between lifts, notched-wedge or echelon paving techniques, and tack coat application on all vertical joint faces.
Joint locations are the most failure-prone points in any asphalt mat, so specifying construction method and minimum density at joints separately from the mat interior is essential for long-term performance.
What Tolerances for Grade, Slope, and Smoothness Should Be Written Into the Spec?
Tolerances for grade, slope, and smoothness written into the spec should define maximum surface deviation, cross-slope accuracy, and ride quality thresholds measured by profilograph or straightedge. Without explicit tolerances, contractors have no objective standard, and owners have no basis for acceptance or correction.
According to Mississippi Department of Transportation smoothness specifications, Category A projects require a surface Mean Roughness Index of not more than 60 inches per mile over a continuous 528-foot interval. Parking lot specs should also address:
- Cross-slope tolerance: Finished surface within ±0.25% of the design grade to maintain proper drainage.
- Straightedge deviation: No more than 3/16 inch over a 10-foot straightedge for driving surfaces.
- Correction protocol: Define whether deficient areas require diamond grinding, removal and replacement, or an overlay.
Including measurable tolerances transforms subjective quality disputes into objective pass/fail criteria, protecting both the property owner and the contractor. With paving specifications fully defined, local climate and soil conditions further shape how these standards are applied in practice.
How Do Local Climate and Soil Conditions Affect Parking Lot Design and Pavement Structure?
Local climate and soil conditions affect parking lot design and pavement structure by dictating frost protection depth, base layer thickness, subgrade stabilization methods, and asphalt mix selection. The subsections below cover freeze-thaw design, expansive soil strategies, and UV and de-icing chemical resistance.
How Should Parking Lot Design Change in Freeze-Thaw Climates Like Colorado’s Front Range?
Parking lot design in freeze-thaw climates like Colorado’s Front Range should change by increasing base depth below the frost line, specifying moisture-insensitive aggregate, and incorporating positive drainage to prevent ice-lens formation beneath the pavement. According to Larimer County structural design data, the minimum frost depth is 30 inches below grade countywide. Pavement sections must extend below this threshold to avoid frost heave, which cracks asphalt from underneath.
Key design adjustments for freeze-thaw environments include:
- Placing granular base and subbase materials below the frost penetration line.
- Specifying free-draining crushed aggregate that sheds meltwater before it refreezes.
- Designing cross slopes at or above 2% to move snowmelt off the surface quickly.
- Adding underdrains where subgrade permeability is poor.
Overlooking frost depth requirements is one of the most common reasons parking lots fail prematurely along the Front Range.
How Do Expansive or Poor Native Soils Influence Base Depth and Stabilization Choices?
Expansive or poor native soils influence base depth and stabilization choices by requiring thicker aggregate sections, chemical treatment, or removal and replacement to prevent subgrade movement from undermining the pavement. A subgrade with a California Bearing Ratio of 10 or greater is considered essential for supporting heavy loads and repetitious loading without excessive deformation, according to the Iowa State University Design Manual (Chapter 6E-1).
When native soils test below that CBR threshold, common stabilization approaches include:
- Lime stabilization, which a 2020 study published in Heliyon found reduces permeability of capping soil by more than 80%.
- Cement-treated subbase for soils with high plasticity indices.
- Over-excavation and replacement with engineered fill where chemical treatment is impractical.
For Colorado’s bentonite-rich clay soils, investing in proper stabilization during initial construction prevents costly reconstruction later.
How Does High UV Exposure and De-Icing Chemical Use Affect Asphalt Mix and Detailing?
High UV exposure and de-icing chemical use affect asphalt mix and detailing by accelerating binder oxidation and weakening the pavement surface. NASA Earth Observatory research confirms that high-elevation environments receive significantly more UV-B radiation because it travels through less atmosphere, encountering fewer radiation-absorbing aerosols and chemical substances such as ozone and sulfur dioxide before reaching the ground.
This intensified UV exposure hardens asphalt binder faster, making surfaces brittle and prone to cracking. Colorado DOT maintenance crews also apply magnesium chloride, which is effective at pavement temperatures above 16°F and penetrates micro-cracks during freeze-thaw cycles.
Protective measures for high-altitude, chemically exposed pavements include:
- Specifying polymer-modified binder for improved flexibility and UV resistance.
- Scheduling sealcoat applications on shorter intervals to renew the protective surface layer.
- Detailing joints and transitions tightly to reduce chemical infiltration paths.
Understanding these regional stressors is the foundation for selecting the right paving contractor and maintenance plan.
How Should You Incorporate Striping, Signage, and Markings Into Your Parking Lot Layout?
You should incorporate striping, signage, and markings by coordinating stall lines, directional arrows, and stop bars for clear traffic guidance, installing required regulatory and wayfinding signs, and maintaining a reapplication schedule that preserves visibility.
How Should Stall Striping, Directional Arrows, and Stop Bars Be Arranged for Clarity?
Stall striping, directional arrows, and stop bars should be arranged to create an intuitive path that drivers can follow without hesitation. Stall lines define each parking space boundary and should align with the chosen parking angle. Directional arrows belong at every aisle entry point and at each turn within the circulation pattern, confirming one-way or two-way flow. Stop bars should be painted at every intersection of a drive aisle with a main circulation lane or pedestrian crosswalk.
Key placement principles include:
- Paint stall lines in high-contrast white or yellow at a minimum width of 4 inches.
- Position directional arrows at the start and midpoint of long one-way aisles.
- Place stop bars 4 feet before crosswalks and aisle intersections.
- Align ADA access aisle hatching perpendicular to the adjacent accessible stall.
Grouping these elements in a consistent visual hierarchy reduces driver confusion and lowers the risk of conflicts at turning points.
What Regulatory and Wayfinding Signs Are Required for Safe Parking Lot Operation?
The regulatory and wayfinding signs required for safe parking lot operation include ADA-accessible parking signs, stop signs, speed limit signs, fire lane markers, one-way or do-not-enter signs, and directional wayfinding panels. According to the Ohio Secretary of State’s Accessible Parking Guide, signs identifying van-accessible spaces must contain the designation “van accessible” and be mounted on a post at least 60 inches above the ground surface, measured to the sign’s bottom edge.
Additional required or recommended signs include:
- Fire lane signs posted at intervals along designated fire access routes.
- Speed limit signs at each entrance, typically 5 to 15 mph for parking lots.
- Pedestrian crossing signs at marked crosswalk locations.
- Wayfinding panels directing drivers to exits, entrances, and overflow areas.
Proper sign placement prevents confusion before drivers commit to a lane, which is far more effective than corrective signage placed after a conflict point.
How Often Should Striping and Markings Be Reapplied to Maintain Visibility?
Striping and markings should be reapplied every 18 to 24 months in most commercial parking lots, though high-traffic areas may need annual touch-ups. The MUTCD 11th Edition specifies that longitudinal markings on roadways with speed limits of 35 mph or greater must maintain retroreflectivity at or above 50 mcd/m²/lx under dry conditions. While parking lots typically operate below that speed threshold, the retroreflectivity standard provides a useful benchmark for evaluating marking degradation.
Factors that accelerate fading include:
- Heavy traffic volume from delivery trucks or daily commuters.
- Snowplow blade contact during winter maintenance.
- UV exposure, which is intensified at Colorado’s higher elevations.
- Chemical contact from de-icing agents applied during freeze-thaw cycles.
Scheduling restriping during spring or early fall allows fresh paint to cure properly before temperature extremes arrive. A consistent marking maintenance plan preserves both safety and a professional appearance, which sets the stage for broader lighting and landscaping decisions that further improve user experience.
How Can You Design for Safety, Visibility, and User Experience in a Parking Lot?
You can design for safety, visibility, and user experience in a parking lot by coordinating lighting placement, landscape islands, and pedestrian separation into a unified site plan. The sections below cover lighting layout, island and curb integration, and pedestrian-vehicle conflict reduction.
How Should Lighting Layout and Pole Placement Be Planned for Security and Night Use?
Lighting layout and pole placement should be planned for security and night use by providing uniform illumination across all drive aisles, stall rows, and pedestrian paths while avoiding dark pockets between fixtures. Pole-mounted LED luminaires spaced at intervals proportional to their mounting height typically achieve the even coverage needed for both surveillance cameras and driver visibility. Fixtures near building entrances and crosswalks should deliver higher foot-candle levels than interior parking rows.
Poles placed within landscape islands or on concrete bases at aisle ends serve double duty: they illuminate the lot and act as physical barriers that protect pedestrians and guide traffic. Shielded, downcast fixtures reduce light trespass onto neighboring properties. For commercial lots that operate after dark, consistent pole spacing is one of the most cost-effective investments in both perceived safety and actual incident reduction.
How Can Islands, Landscaping, and Curbs Be Used Without Harming Drainage or Maneuvering?
Islands, landscaping, and curbs can be used without harming drainage or maneuvering by sizing them to fit within the parking module while directing stormwater toward collection points rather than blocking its path. Landscape islands placed at row ends should align with the stall depth so they do not narrow the drive aisle below minimum width. Curb cuts or recessed inlets within each island allow runoff to enter planted areas, where soil and root systems filter sediment before water reaches the storm system.
Tree species with non-invasive root systems prevent future pavement heaving. According to the Iowa DOT Design Manual, longitudinal slopes below 0.5% can cause ponding and debris accumulation on curbed surfaces, so grading around islands must maintain adequate cross slope. Keeping island widths to a functional minimum preserves turning clearance for delivery trucks and fire apparatus.
How Do You Minimize Pedestrian–Vehicle Conflicts Near Building Entrances and Crosswalks?
You minimize pedestrian-vehicle conflicts near building entrances and crosswalks by physically separating foot traffic from vehicle lanes through raised walkways, bollards, and clearly marked crossing zones. According to the National Highway Traffic Safety Administration, parking lot and driveway-related crashes represent 15% to 25% or more of all reported pedestrian crashes. Designated pedestrian corridors that run perpendicular to parking rows and connect directly to building entrances eliminate the need for walkers to navigate through active drive aisles.
Key conflict-reduction strategies include:
- Installing raised crosswalks or speed tables at primary pedestrian crossings to slow vehicles.
- Placing stop bars and high-visibility continental striping at every crossing point.
- Routing drive aisles so vehicles approach building fronts at low speeds and oblique angles.
- Positioning accessible parking closest to entries, reducing exposure distance for vulnerable users.
Thoughtful pedestrian separation at the design stage costs far less than retrofitting after incidents occur. With these safety elements established, planning for long-term maintenance ensures they remain effective over the pavement’s full lifecycle.
How Do You Plan for Future Maintenance and Lifecycle Costs When Designing a Parking Lot?
You plan for future maintenance and lifecycle costs by designing repair-friendly joints, scheduling preventive treatments, and knowing when reconstruction outweighs resurfacing. The sections below cover joint and access planning, sealcoat and overlay budgeting, and reconstruction decision points.
How Should Joint Locations, Phasing, and Access Be Planned to Simplify Future Repairs?
Joint locations, phasing, and access should be planned so maintenance crews can isolate and repair sections without disrupting the entire lot. Placing longitudinal and transverse joints along natural traffic boundaries lets crews mill and overlay individual bays while keeping adjacent areas open. Phased construction sequences, where drive lanes and stall fields are built as independent sections, allow future repairs to proceed in stages.
Key planning considerations include:
- Aligning joints with stall lines and aisle edges so saw cuts follow existing striping patterns.
- Designing drive lanes wide enough for milling machines and paving equipment to access interior sections.
- Locating utility trenches outside high-traffic wear zones to prevent repeated cut-and-patch cycles.
- Reserving staging areas near entrances for material delivery during overlay projects.
For commercial properties with high daily traffic counts, this foresight during design significantly reduces the cost and duration of every future repair event.
How Often Should Sealcoating, Crack Sealing, and Overlays Be Budgeted Into the Lifecycle?
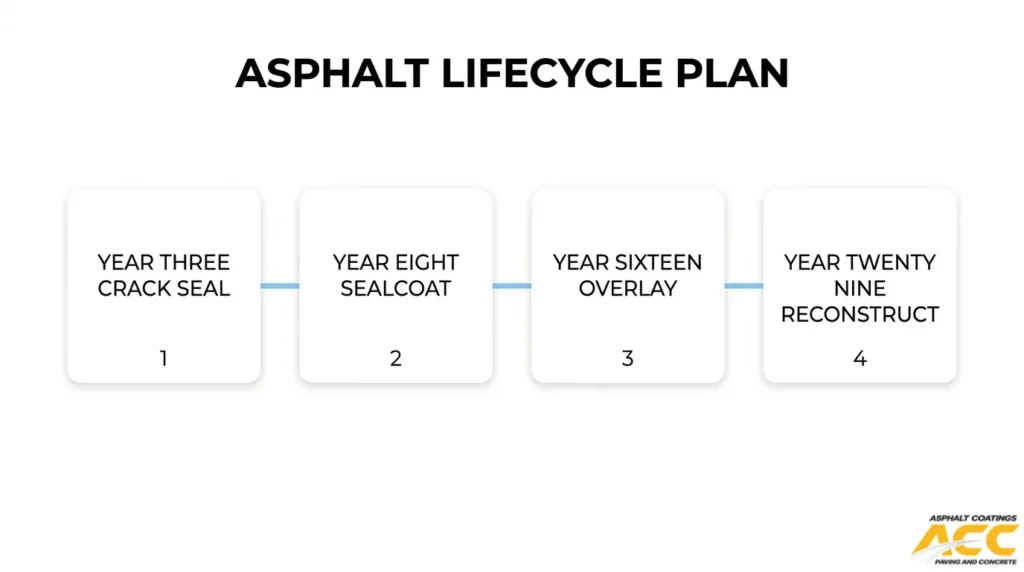
Sealcoating, crack sealing, and overlays should be budgeted at regular intervals across the pavement’s full service life. According to the City of Fort Worth Transportation and Public Works Department’s Street Maintenance Program, a typical asphalt lifecycle includes crack sealing at year 3, sealcoating at year 8, an asphalt overlay at year 16, followed by repeated crack seal and sealcoat cycles before reconstruction around year 29.
A practical maintenance budget timeline includes:
- Years 1 to 5: Crack sealing shortly after working cracks develop, ideally during spring or fall when temperatures are moderately cool.
- Years 5 to 10: First sealcoat application to protect against UV oxidation and moisture infiltration.
- Years 12 to 18: Non-structural or structural overlay to restore ride quality and surface integrity.
- Years 18 to 30: Repeated preventive cycles before full reconstruction becomes necessary.
Skipping even one cycle accelerates deterioration and compresses the timeline toward costly reconstruction.
When Does It Make Sense to Reconstruct Versus Resurface a Worn Parking Lot?
It makes sense to reconstruct rather than resurface a worn parking lot when structural failures have compromised the base layers. Alligator cracking is a key indicator of roadway base failure, which may require full-depth reconstruction, according to the Town of Burlington Engineering Division’s Pavement Management Instruction Manual. An overlay applied over a failed base will reflect the same distress patterns within one to two seasons.
Resurfacing remains appropriate when:
- Surface distress is limited to oxidation, minor cracking, or shallow raveling.
- The existing base and subgrade still provide adequate structural support.
- Pavement condition index scores remain above the threshold where preventive treatments are effective.
Reconstruction becomes the only viable path when subgrade drainage has failed, base materials have lost bearing capacity, or widespread alligator cracking covers more than 25% of the surface area. Investing in proper subgrade preparation and drainage during the original design phase delays this tipping point by years.
With lifecycle costs mapped out, working alongside a specialized contractor ensures each maintenance phase is executed correctly from the start.
How Should You Approach Parking Lot Design and Layout With a Specialized Asphalt Contractor?
You should approach parking lot design and layout with a specialized asphalt contractor by partnering early on stall sizing, aisle widths, drainage slope, paving specifications, and long-term maintenance planning. The sections below cover how Asphalt Coatings Company supports this process and the key takeaways from the entire design discussion.
How Can Asphalt Coatings Company Help With Parking Lot Design, Paving Specs, and Long-Term Maintenance?
Asphalt Coatings Company helps with parking lot design, paving specs, and long-term maintenance by combining decades of Colorado Front Range experience with in-house crews that handle every phase, from subgrade preparation and grading through final striping. This single-source approach means one team coordinates stall dimensions, drainage slope, asphalt mix selection, and ADA-compliant concrete work rather than splitting accountability across subcontractors.
Asphalt Coatings Company provides commercial clients with:
- Parking lot construction and full-depth paving installation sized for actual traffic loads.
- Subgrade preparation calibrated to Colorado’s expansive soils and freeze-thaw cycles.
- Crack sealing with CDOT-approved materials, sealcoating, and mill-and-pave services on a scheduled lifecycle.
- Parking lot striping, ADA-compliant markings, and curb-and-gutter installation.
For property managers, industrial complex owners, and shopping center operators, having a contractor who understands how high-altitude UV exposure and de-icing chemicals accelerate pavement deterioration makes the difference between a surface that lasts and one that fails prematurely.
What Are the Key Takeaways About Parking Lot Design and Layout, Including Stall Sizes, Aisle Widths, Drainage Slope, and Paving Specifications?
The key takeaways about parking lot design and layout are that stall sizes, aisle widths, drainage slope, and paving specifications must work together as an integrated system rather than be treated as isolated decisions.
- Standard stalls typically measure 9 feet wide by 18 to 19 feet deep, while ADA van-accessible spaces require at least 132 inches of width plus an adjacent access aisle.
- Two-way drive aisles need a minimum of 24 feet; one-way aisles can narrow to 12 to 14 feet depending on parking angle.
- A 2% cross slope prevents ponding, while longitudinal slopes below 0.5% invite standing water and debris accumulation.
- Asphalt lift thickness, compaction temperature, and base material selection directly determine how long the pavement performs under load.
- Lifecycle maintenance, including crack sealing, sealcoating, and planned overlays, protects the initial investment and delays costly reconstruction.
Every specification choice affects the ones around it. Prioritizing drainage slope, for example, influences grading, inlet placement, and even how stall rows are oriented. Working with a contractor who understands these interdependencies from the start is the most reliable way to build a parking lot that serves its users safely and holds up over time.