Parking lot bollard installation is the process of embedding or mounting sturdy vertical posts in a parking area to control vehicle access, protect pedestrians, and shield buildings from accidental or deliberate vehicle strikes.
This guide covers bollard types and selection, layout and spacing design, footing engineering, installation methods for asphalt and concrete surfaces, permits and ADA compliance, installed costs, climate and freeze-thaw durability, coordination with striping and signage, damage repair and replacement, and contractor selection.
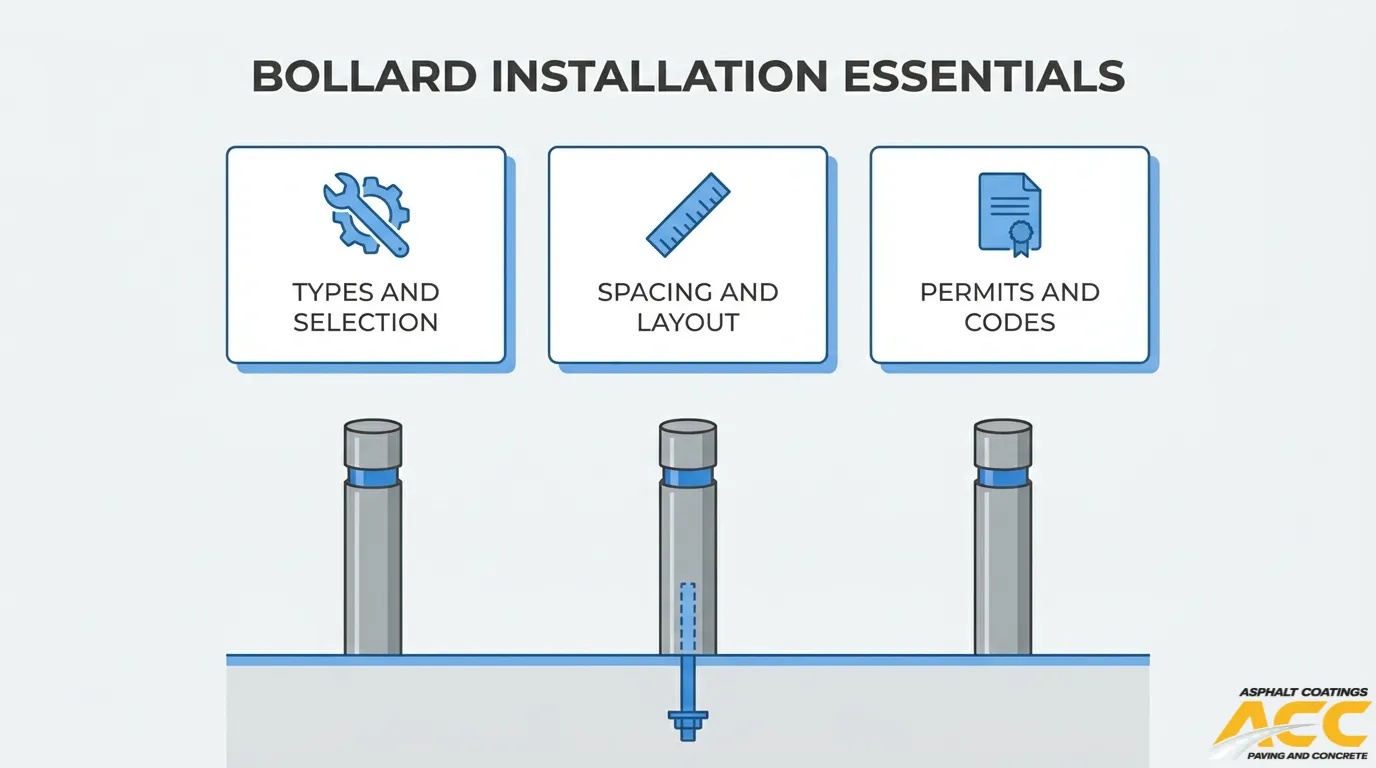
Bollard types range from lightweight decorative guides to concrete-filled steel security posts, and matching the right category to each parking lot zone prevents overbuilding in low-risk areas while avoiding dangerous underprotection where threats exist.
Layout and spacing requirements vary by function: storefront protection demands bollards no more than 5 feet apart on center, while pedestrian access routes require at least 48 inches of unobstructed clear width to maintain ADA compliance.
Footing depth depends on soil conditions, local frost lines, bollard diameter, and crash-rating requirements; standard embedded installations typically need a minimum 3-foot-deep concrete footing with air-entrained mixes in freeze-thaw climates.
Installation methods differ significantly between core-drilling into existing concrete, embedding during new pours, cutting through asphalt for separate footings below, and surface-mounting with base plates.
Permits, IBC load requirements, zoning setbacks, and ADA detectability standards all govern where and how bollards can be placed; some jurisdictions require separate street use permits or revocable consent processes that take months to secure.
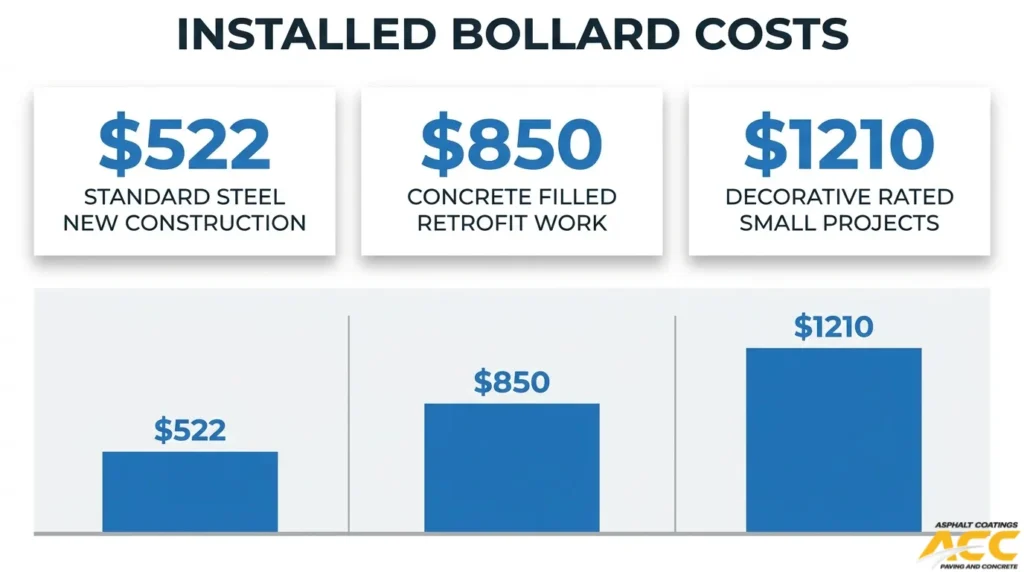
Installed costs from municipal bid data range from roughly $522 to $1,210 per bollard, with pricing driven by material choice, retrofit versus new construction, project volume, and seasonal conditions.
Long-term performance depends on corrosion-resistant coatings, proper drainage around footings, seasonal salt removal, and post-impact inspections that catch misalignment before structural failure occurs.
What Are Parking Lot Bollards and When Are They Needed?
Parking lot bollards are short, sturdy vertical posts installed to control vehicle access, protect pedestrians, and shield buildings from accidental or deliberate vehicle strikes. Property managers typically need them at storefronts, building entrances, pedestrian walkways, utility equipment zones, and fire lanes. The sections below define what bollards are, explain when installation becomes necessary, and outline the core protection categories.
What Is a Parking Lot Bollard?
A parking lot bollard is a sturdy, short vertical post used to control traffic access. According to The University of Texas at Austin Parking and Transportation division, a bollard is either fixed or retractable. These posts range from lightweight decorative guides to heavy steel pipes filled with concrete, depending on the level of protection required. In commercial parking lots, bollards serve as physical barriers between vehicle travel lanes and areas where people walk, stand, or enter buildings. Their diameter, wall thickness, and footing depth all scale with the anticipated threat level, making proper specification essential before any installation begins.
When Do Commercial Properties Need Bollard Installation?
Commercial properties need bollard installation when vehicles pose a credible risk to pedestrians, structures, or equipment in or near the parking lot. Several common conditions trigger this need:
- Storefront and entrance protection: Retail locations with parking stalls facing glass facades require bollards to prevent vehicles from breaching the building envelope.
- Pedestrian walkway separation: Sidewalks and crosswalks adjacent to drive aisles need physical barriers to separate foot traffic from moving vehicles.
- Utility and equipment shielding: Transformers, gas meters, HVAC units, and backflow preventers positioned near parking areas benefit from bollard protection against accidental impact.
- Fire lane and access control: Removable or retractable bollards manage vehicle entry to fire lanes, service corridors, and restricted zones while preserving emergency access.
- Ram raid and security deterrence: High-value retail, pharmacy, and financial sites use security-rated bollards to resist intentional vehicle penetration.
A U.S. District Court case in Kansas documented that one convenience-store chain recorded over 100 incidents where vehicles jumped the curb and struck the building or a pedestrian. That level of exposure makes bollard installation less of an upgrade and more of a liability control measure for any property with head-in parking near occupied spaces.
What Is the Difference Between Security and Non-Security Bollards?
The difference between security and non-security bollards is their engineered resistance to vehicle impact. Non-security bollards guide traffic flow and mark boundaries; they deter low-speed, accidental contact but are not designed to stop a determined vehicle. Security bollards, by contrast, resist deliberate attempts to penetrate them using vehicles, as the New York State Department of Transportation notes, and are validated through standardized crash-testing systems.
Non-security bollards typically consist of thin-wall steel pipe, concrete-filled tubes without reinforced footings, or decorative covers over lightweight cores. Security bollards require heavy-wall steel pipe, deep reinforced concrete footings, and independent certification. For most commercial parking lots, standard non-security bollards provide adequate protection against errant passenger vehicles. Properties facing higher threat levels, such as government buildings, transit stations, or high-traffic retail centers, should specify crash-rated security bollards with documented penetration performance ratings.
Choosing the right category early in project planning directly affects footing depth, material cost, and permit requirements for the entire installation.
How Do You Choose the Right Type of Bollard for a Commercial Parking Lot?
You choose the right type of bollard for a commercial parking lot by matching the bollard’s function, material, and mounting method to the specific threat level, traffic pattern, and access needs of each zone. The key factors include fixed versus removable designs, security ratings, and ADA compliance.
What Is the Difference Between Fixed, Removable, and Retractable Bollards?
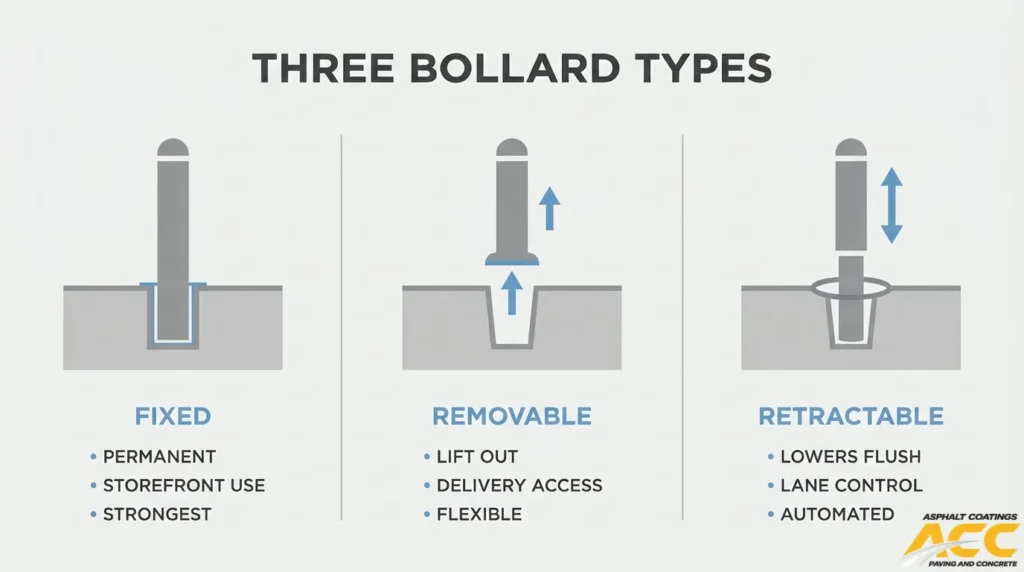
The difference between fixed, removable, and retractable bollards lies in their permanence and operational flexibility:
- Fixed bollards are permanently embedded in concrete footings and provide continuous, uninterrupted protection for storefronts, utility areas, and pedestrian zones.
- Removable bollards lock into a ground-mounted receiver sleeve and can be lifted out to allow temporary vehicle access for deliveries, maintenance, or emergency routes.
- Retractable bollards lower flush into the pavement mechanically or manually, enabling on-demand lane control without physically relocating the post.
According to CISA’s Vehicle Incident Prevention and Mitigation Security Guide, rated perimeter protection devices such as bollards can be fixed in place for permanent protection or be deployable, portable, or removable. For most commercial parking lots, fixed bollards handle the majority of perimeter needs, while a few strategically placed removable units preserve operational flexibility.
How Do Security Bollards Differ From Standard Traffic Bollards?
Security bollards differ from standard traffic bollards in their engineering purpose and tested impact resistance. Standard traffic bollards guide vehicles, mark lane boundaries, and protect landscaping or equipment; they are not designed to stop a deliberate vehicle strike. Security bollards, by contrast, are engineered and crash-tested to resist intentional vehicular penetration.
According to the New York State Department of Transportation, security bollards differ from non-security bollards in that they are designed to resist deliberate attempts to penetrate them using vehicles, and various standardized testing systems have been developed to verify performance. Properties with high-value storefronts, pedestrian gathering areas, or elevated threat profiles should specify security-rated bollards rather than relying on standard traffic posts alone.
Which Bollard Type Fits Different Parking Lot Zones?
The bollard type that fits each parking lot zone depends on the zone’s exposure to vehicle traffic, pedestrian density, and required access flexibility:
- Storefront and building perimeters need fixed, impact-rated steel bollards filled with concrete to prevent vehicle incursions into occupied spaces.
- Loading docks and service corridors benefit from removable bollards that allow truck access during scheduled deliveries yet block unauthorized entry at other times.
- Pedestrian walkways and ADA routes require shorter decorative or standard-duty fixed bollards spaced to maintain a minimum 48-inch clear width.
- Fire lanes and emergency access points call for collapsible or removable bollards so first responders can enter quickly without obstruction.
- Drive aisles and lot entrances may use retractable bollards for after-hours lot closure while keeping daytime traffic flowing.
Matching bollard type to zone function prevents costly overbuilding in low-risk areas and dangerous underprotection where threats are real. With the right bollard types selected, the next step is designing proper layout and spacing for each zone.
How Should You Design Bollard Layout and Spacing for Vehicle and Pedestrian Safety?
You should design bollard layout and spacing by matching post intervals to the specific threat level, adjusting setback distances from buildings and walkways, and preserving ADA-compliant clearances throughout the parking lot. The sections below cover storefront versus traffic-lane spacing, building proximity, parking lot integration, ADA considerations, and vehicle-weight categories.
How Does recommended bollard spacing change between storefront protection and traffic lanes?
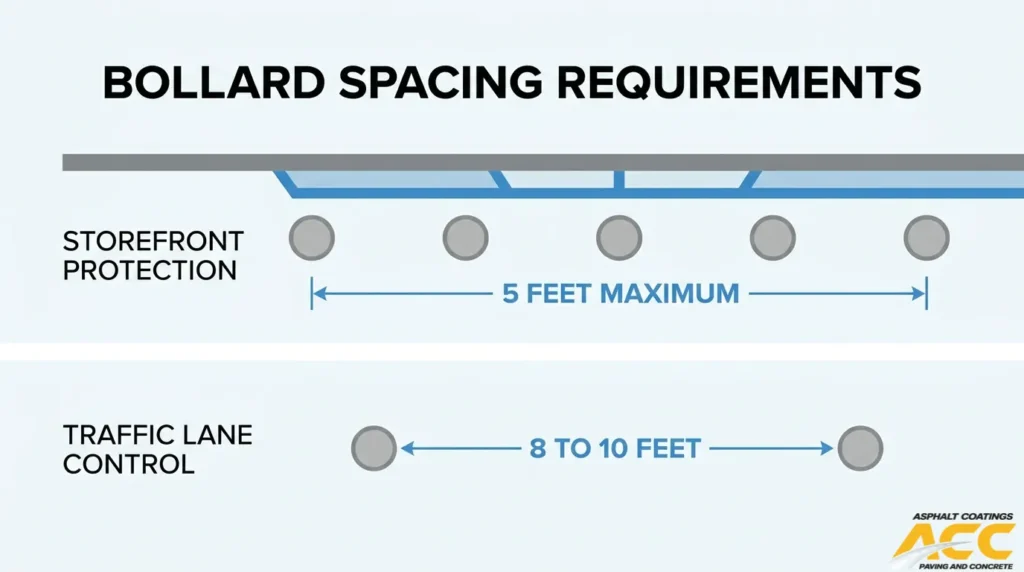
https://www.oregon.gov/lcd/CL/Documents/CFECWalkableDesignStandards.pdfRecommended bollard spacing changes between storefront protection and traffic lanes based on the width of the vehicle you need to block. Storefronts require tighter spacing because even a compact car can breach a wide gap at low speed. According to the Oregon Department of Land Conservation and Development’s Walkable Design Guidebook, bollard spacing must be no further apart than 5 feet on center when protecting pedestrian paths adjacent to buildings.
Traffic-lane bollards serve a different function: controlling authorized vehicle access rather than stopping errant or hostile vehicles. Fixed and retractable bollards can be spaced wider in drive aisles where the goal is channeling traffic, not forming a continuous crash barrier. Key distinctions include:
- Storefront lines typically use 4-to-5-foot center-to-center spacing to prevent passenger vehicles from passing between posts.
- Traffic-lane control points can use wider gaps, provided retractable or removable bollards restrict unauthorized entry during off-hours.
Tighter storefront spacing is non-negotiable for pedestrian safety; traffic-lane spacing allows more flexibility based on access needs.
How close should bollards be to building fronts, doors, and glazing?
Bollards should be placed close enough to building fronts, doors, and glazing to intercept a vehicle before it reaches the structure, yet far enough to preserve pedestrian circulation and emergency egress. A common guideline positions the bollard line 24 to 36 inches from the face of the building, which stops most vehicles while leaving a walkable buffer.
Placing bollards too close to glass storefronts risks transferring impact energy into the facade. Placing them too far away creates a gap where a deflected vehicle can still reach the entrance. Door locations demand extra attention: bollards flanking entry doors should not obstruct the door swing arc or block wheelchair access. For properties with documented vehicle-into-building incidents, even modest setback errors can have serious consequences. One Maryland appellate case described a vehicle that ran over a wheel stop, crossed the pedestrian walkway, and crashed through glass entrance doors, illustrating how quickly an unprotected gap becomes a liability.
How should bollard placement and spacing work with existing parking lot striping and traffic flow?
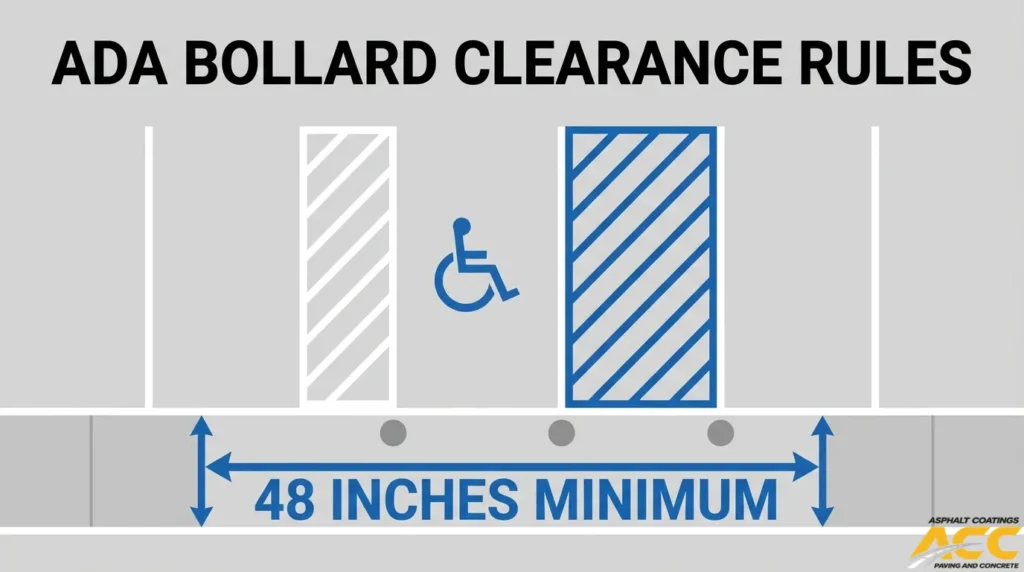
Bollard placement and spacing should work with existing parking lot striping and traffic flow by aligning posts with stall lines, drive-aisle edges, and pedestrian crossings so they protect without disrupting circulation. The U.S. Access Board’s PROWAG guidelines require that obstructions such as bollards shall not reduce the clear width of the pedestrian access route to less than 48 inches measured from the edge of the obstruction.
Practical coordination steps include:
- Centering bollards on existing stall-line endpoints so posts reinforce visual lane boundaries rather than creating mid-aisle obstacles.
- Maintaining drive-aisle widths that satisfy fire-lane and turning-radius requirements after bollard installation.
- Sequencing bollard work with any planned repaving or restriping to avoid cutting into fresh asphalt.
Where parking lots are resurfaced in phases, as is common on active commercial properties, bollard installation should be staged within the same phase as adjacent paving to prevent double-mobilization costs and unnecessary pavement cuts.
How do you plan bollard spacing around ADA parking stalls, ramps, and walkways?
You plan bollard spacing around ADA parking stalls, ramps, and walkways by preserving required access-aisle widths and maintaining clear landing areas at curb ramps. The City of Los Angeles Department of City Planning specifies that physical separation methods such as bollards must be no less than 30 inches in height and separated by no more than five feet.
Critical ADA considerations include:
- Keeping a minimum 48-inch-by-48-inch clear area beyond the bottom of perpendicular curb ramp runs.
- Never placing bollards within the 5-foot-wide access aisle adjacent to an ADA parking stall.
- Ensuring bollard height and profile remain cane-detectable for visually impaired pedestrians.
ADA violations from poorly placed bollards are among the most avoidable mistakes in parking lot design, yet they occur frequently when bollard layout is planned independently of accessibility requirements.
How does bollard spacing differ for light-duty, standard, and heavy truck traffic areas?
Bollard spacing differs for light-duty, standard, and heavy truck traffic areas because the kinetic energy a bollard must absorb scales with vehicle mass and speed. According to the New York State Department of Transportation, security bollards differ from non-security bollards in that they are designed to resist deliberate attempts to penetrate them using vehicles, with various standardized testing systems developed to rate performance.
Key differences by traffic category:
- Light-duty areas (passenger vehicles only): non-security bollards at 4-to-5-foot spacing, typically pipe-filled with concrete at standard footing depths.
- Standard traffic areas (delivery vans, box trucks): closer spacing of 3 to 4 feet with deeper footings and crash-rated posts where storefront protection is needed.
- Heavy truck zones (semi-trailers, refuse trucks): security-rated bollards tested under ASTM F2656 or F3016 standards, installed at engineered intervals with reinforced foundations.
Seasonal access also matters. Some facilities remove bollards for winter to facilitate snow removal and maintain emergency access, which means removable sleeves should be specified in regions with heavy snowfall.
With spacing strategies established for each vehicle class, the next step is ensuring bollard footings can handle the loads these layouts demand.
How Deep and Wide Should Bollard Footings Be in a Parking Lot?
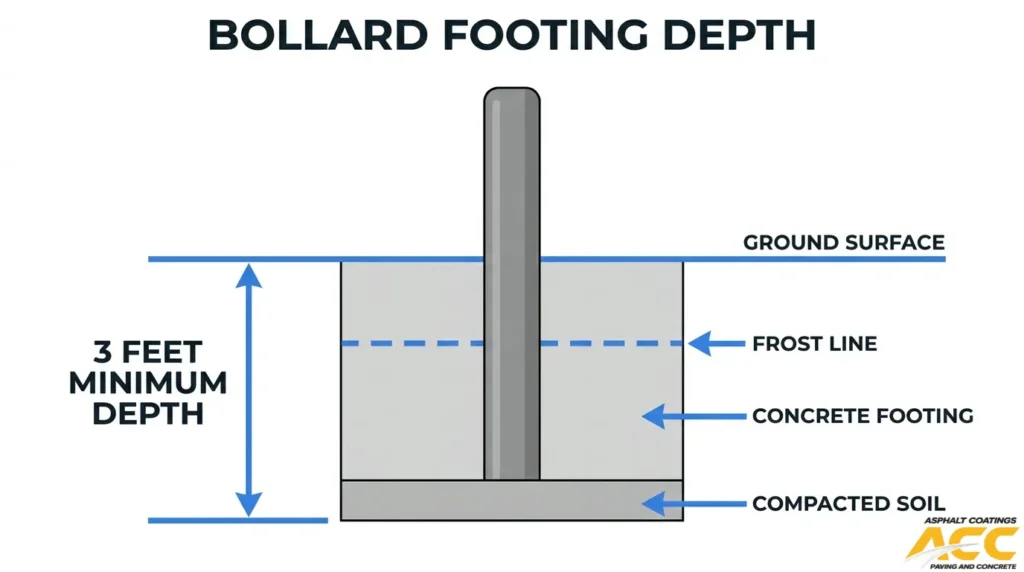
Bollard footings in a parking lot should typically reach a minimum depth of 3 feet, with width determined by the bollard diameter plus concrete backfill. The exact dimensions depend on soil conditions, frost depth, impact rating, and underground utilities.
How do soil conditions affect required bollard footing depth and size?
Soil conditions affect required bollard footing depth and size by determining how much lateral resistance the ground provides against vehicle impact loads. Loose, sandy, or poorly compacted soils require deeper and wider footings to compensate for reduced bearing capacity, while dense clay or compacted aggregate base can support shallower embedments.
When bollards are relocated or replaced, proper excavation becomes critical. According to a Town of Belmont, Massachusetts specification, the contractor must cleanly cut away surface pavement before removal, excavate as required, and remove excess material for reinstallation, with concrete footings paid separately under 3,000 psi cement concrete masonry per cubic yard. This highlights how footing work in varied soil conditions is treated as distinct, measurable scope.
A geotechnical assessment before installation prevents oversized or undersized footings. Security bollards must also avoid obstructing accessible routes, so footing width should account for both structural need and clearance compliance.
How do local frost depth and freeze–thaw cycles affect bollard footing design?
Local frost depth and freeze-thaw cycles affect bollard footing design by dictating the minimum embedment needed to prevent frost heave. Footings that sit above the frost line can shift upward during winter, misaligning the bollard and cracking surrounding pavement.
In northern climates, frost depths commonly range from 36 to 48 inches, requiring footing bottoms to extend below that line. However, insulated approaches can reduce this requirement. According to NOAA, a frost-protected shallow foundation incorporates strategically placed insulation to raise the frost depth around a structure, allowing foundation depths as shallow as 16 inches even in the most severe climates.
For parking lot bollards without insulation, the safest practice is extending the footing below the local frost line. In Colorado’s Front Range, where freeze-thaw cycling is aggressive, this single design decision often determines whether a bollard stays plumb through its service life.
How do bollard size and impact rating affect concrete footing dimensions?
Bollard size and impact rating affect concrete footing dimensions by increasing the required mass, depth, and reinforcement needed to absorb and redirect vehicle energy. Larger diameter bollards and higher crash ratings demand proportionally larger footings.
Standard decorative or traffic-guide bollards with 4-inch to 6-inch pipe diameters typically need modest footings, often 12 inches wide with 24 to 36 inches of depth. Security-rated bollards require significantly more. According to ASTM F3016/F3016M-19, the standard test method uses a 5,000-pound surrogate test vehicle across a range of impact speeds to establish penetration performance ratings. The ASTM F2656 M-class designation scales further, referencing a 15,000-pound commercial vehicle at perpendicular impact speeds measured in miles per hour.
Concrete mix matters as well. The Federal Highway Administration found that at least 3 percent air by volume in fresh concrete is necessary to protect against freezing and thawing, with most state DOTs specifying 5 to 7 percent air content where exposure is significant. Higher-rated bollards paired with air-entrained concrete create footings that resist both impact loads and climate degradation.
How do nearby utilities, drainage structures, and base layers affect footing design in a paved lot?
Nearby utilities, drainage structures, and base layers affect footing design in a paved lot by constraining where and how deep concrete footings can be placed. Conflicts with buried electric lines, water mains, sewer pipes, or stormwater structures can force footing relocation, reduced depth, or engineered workarounds.
Utility location is a legal requirement before excavation. According to the City of Branson, Missouri contract specifications, the contractor must enlist the assistance of the Missouri One Call System to locate electric, water, sewer, and traffic signal utilities before starting work.
Base layers present another constraint. Parking lots built over thick aggregate bases or stabilized subgrade may allow shallower footings due to improved load distribution, while lots with thin base sections over expansive soil need deeper embedment. Drainage structures like catch basins and underground piping create exclusion zones where footing excavation could compromise pipe integrity or redirect stormwater flow.
Mapping all subsurface conditions before layout finalization prevents costly mid-project redesigns and keeps accessible routes unobstructed.
What Are the Main Methods for Installing Bollards in Asphalt and Concrete Parking Lots?
The main methods for installing bollards in asphalt and concrete parking lots are core-drilling into existing concrete, embedding during new concrete pours, cutting through asphalt to place separate concrete footings, and surface-mounting with base plates. Each method suits different pavement conditions and project requirements.
How does installation differ between core-drilled bollards in existing concrete and new-pour concrete settings?
Installation differs between core-drilled bollards in existing concrete and new-pour concrete settings primarily in how the bollard anchors into the slab.
Core-drilled installation in existing concrete requires cutting a hole into cured pavement. According to University of Houston 2016 specifications, bollards must be anchored in formed or core-drilled holes not less than 8 inches deep and 3/4 inch larger than the outer diameter of the bollard, with the annular space filled solidly with nonshrink, nonmetallic grout. Before drilling, the existing slab should be evaluated for subsurface deterioration; as the Texas DOT notes, when spalling occurs, damage often extends beyond the visible area.
New-pour installation uses pipe sleeves preset and anchored directly into wet concrete, eliminating the need for post-cure drilling. The footing concrete should meet a minimum 3,000 PSI compressive strength, per the City of Coeur d’Alene’s removable bollard detail. This approach produces a stronger monolithic bond between bollard and slab. For parking lots exposed to freeze-thaw cycling, specifying air-entrained concrete in the footing further protects against seasonal cracking. Colorado’s Front Range presents unique challenges for parking lot infrastructure due to its extreme freeze-thaw cycles and high-altitude conditions. Working with a contractor experienced in these regional demands -msuch as one with decades of Colorado-specific project history – ensures bollard footings and surrounding pavement are engineered to withstand the climate from the start.
How are bollards installed through asphalt pavements with separate concrete footings below?
Bollards are installed through asphalt pavements by cutting through the asphalt surface, excavating below it, pouring a concrete footing at the required depth, setting the bollard post, and then restoring the surrounding asphalt.
The process follows a general sequence:
- Saw-cut and remove the asphalt in a controlled area around the planned bollard location.
- Excavate to the specified footing depth, typically 36 inches minimum for standard security applications.
- Pour the concrete footing and set the bollard plumb while the concrete is wet.
- Allow the concrete and post to become firm and level, then use asphalt cold patch to fill the remaining hole, as described in Oklahoma State University’s installation procedure.
- Apply a tack coat to all edges of the existing asphalt before placing new pavement, and seal all seams between new and existing pavements with tack coat or rubberized crack seal material.
That final sealing step, documented in Tennessee DOT’s 2024 utility repair standards, prevents water infiltration at the joints. Skipping it is one of the most common causes of premature pavement failure around bollard installations.
When should you use surface-mounted or removable bollards instead of embedded ones?
Surface-mounted or removable bollards should be used instead of embedded ones when deep excavation is impractical, when access needs change seasonally, or when the pavement cannot be significantly disturbed.
Common scenarios favoring surface-mounted or removable options include:
- Utility conflicts below grade that prevent safe excavation for deep footings.
- Seasonal access requirements, such as removing bollards in winter to facilitate snow plowing and maintain emergency vehicle access.
- Temporary traffic control for events, construction phasing, or evolving site layouts.
- Structural slab limitations where core-drilling would compromise post-tensioned concrete or thin pavement sections.
- Leased properties where permanent modifications require landlord approval or may not be permitted.
Surface-mounted bollards bolt to the existing slab using anchor plates, avoiding excavation entirely. Removable bollards use a receiver sleeve cast into a concrete footing; the post lifts out when access is needed. The trade-off is reduced impact resistance compared to fully embedded bollards, making them better suited for traffic guidance than high-security applications.
Understanding how each installation method interacts with local permits and ADA clearance requirements ensures compliance from the start.
What Permits, Codes, and ADA Requirements Apply to Parking Lot Bollard Installation?
Bollard installation in parking lots is governed by building permits, right-of-way permits, zoning approvals, the International Building Code, and ADA accessibility standards. The subsections below cover when permits are required, how zoning affects placement, what the IBC mandates for crash protection, and how ADA rules shape clearance and detectability.
When does bollard installation require a building permit or right-of-way permit?
Bollard installation requires a building permit when the work involves structural excavation, concrete footings, or alterations to a parking facility. Right-of-way permits apply when bollards encroach on public sidewalks or streets.
Permit triggers vary by jurisdiction:
- Structural bollards set in concrete footings typically require a standard building permit from the local building department.
- Bollards placed in public rights-of-way require separate street use review. According to the City of Seattle’s Director’s Rule 4-2011, installations such as platforms, planters, utility installations, and bollards shall require a separate Street Use review and permits.
- In New York City, no permanent installation designed primarily for the abutting property owner is allowed within the right-of-way except through DOT’s Revocable Consent program, a process that can take approximately six months before a DOB permit is issued.
In states like California, any contractor altering a parking facility must hold a CSLB license if the project requires a building permit or exceeds $1,000 in total cost. Skipping the permit research phase is one of the most common ways bollard projects stall mid-construction; confirming requirements before breaking ground saves weeks of delays.
How do zoning and site plan approvals affect where you can place bollards?
Zoning and site plan approvals affect bollard placement by dictating setback distances, pedestrian separation requirements, and allowable obstruction heights within commercial parking areas. Most municipalities require bollard installations to comply with the approved site plan, meaning any new bollards not shown on the original plan may trigger a site plan amendment or administrative review.
Zoning codes often specify physical separation standards for pedestrian walkways. These requirements determine minimum bollard height, maximum spacing, and acceptable placement zones relative to property lines and building facades. Adding bollards that conflict with approved landscaping buffers, fire lanes, or access easements can result in code violations. Checking the current site plan and local zoning overlay before selecting bollard locations prevents costly repositioning after installation.
How do IBC and local building codes affect bollard strength and crash protection requirements?
IBC and local building codes affect bollard strength and crash protection requirements by establishing minimum barrier heights, load resistance standards, and placement triggers based on elevation changes. According to the 2024 International Building Code Section 406.4.2, vehicle barriers not less than 2 feet 9 inches (835 mm) in height shall be placed where the vertical distance from a drive lane or parking space to the ground below exceeds 1 foot (305 mm), and these barriers must comply with the loading requirements of Section 1607.11.
Local amendments often add requirements beyond the IBC baseline:
- Higher load ratings near storefronts or occupied spaces.
- Specific bollard diameters or material grades for security applications.
- Engineer-stamped footing designs for crash-rated installations.
Treating IBC minimums as the final standard is a common oversight. Local jurisdictions frequently adopt stricter amendments, so confirming the locally adopted code edition and any overlay requirements is essential before specifying bollard strength.
How do ADA standards influence bollard location, clearance, and detectability for pedestrians?
ADA standards influence bollard location, clearance, and detectability by establishing maximum protrusion limits, minimum clear widths, and cane-detectable height thresholds along accessible routes. Under the 2010 ADA Standards for Accessible Design (Section 307.2), objects with leading edges between 27 inches and 80 inches above the ground shall protrude no more than 4 inches horizontally into the circulation path.
Key ADA requirements for bollard placement include:
- Bollards must not reduce the pedestrian access route clear width below 48 inches.
- Posts must be detectable by cane at or below 27 inches above grade, or they become a protruding-object hazard.
- Curb ramp landings require a 36-inch minimum clear length beyond the bottom grade break.
Federal regulation 36 CFR Appendix C to Part 1191 further states that security barriers, including security bollards, shall not obstruct a required accessible route or accessible means of egress. Failing an ADA audit after installation is far more expensive than designing compliant spacing from the start.
With regulatory requirements established, the next step is understanding installed costs across different project scenarios.
How Much Does It Cost to Install Bollards in a Commercial Parking Lot?
The cost to install bollards in a commercial parking lot depends on material type, installation method, project scale, and site conditions. Below, each factor is broken down with real bid data and practical cost considerations.
How does bollard material (steel, concrete-filled, decorative) change installation cost?
Bollard material changes installation cost by affecting both the unit price of the post and the labor required to set it. Standard steel pipe bollards sit at the lowest price point. Concrete-filled steel bollards cost more due to heavier handling and the added step of filling and vibrating concrete inside the pipe. Decorative bollards, which include powder-coated covers or stainless-steel sleeves, add a significant material premium on top of identical footing work.
Municipal bid data illustrates the range clearly. According to the 2024 James City Service Authority bid tab, installed bollard unit prices from four bidders ranged from $522 to $1,210 per unit for standard posts set on a gravel base with a concrete bed. Decorative or architecturally specified bollards in comparable projects can push per-unit installed costs well above that ceiling. For most commercial parking lots, concrete-filled steel bollards offer the best balance of impact resistance and cost efficiency.
How does installing bollards in existing pavement compare in cost to adding them during new construction?
Installing bollards in existing pavement costs more per unit than adding them during new construction. Retrofit work requires saw-cutting or core-drilling through cured asphalt or concrete, excavating for footings, and then patching the surrounding surface. Each of those steps adds labor hours and material that new construction avoids entirely.
During new construction, bollard sleeves or footings are formed and poured alongside curbs, sidewalks, and pavement base layers. The excavation equipment is already on site, concrete trucks are already scheduled, and asphalt patching is unnecessary because the final lift has not been placed yet. This shared mobilization and sequencing can reduce per-bollard installation costs substantially compared to a standalone retrofit project.
How does project size and number of bollards affect per-unit pricing?
Project size and number of bollards affect per-unit pricing by spreading fixed mobilization, equipment, and concrete delivery costs across more units. A two-bollard job carries nearly the same setup overhead as a twenty-bollard job, so per-unit cost drops as quantity increases.
Public bid records confirm this pattern. The 2023 City of Oxnard bid tab shows a unit price of $950 per installed 3-inch steel bollard for a quantity of just two. By contrast, the 2026 Ogden City bid tab lists $680 per bollard for a four-unit installation, and the 2023 Charlottesville RFQ estimated 500 total installations under a single contract, a volume that drives unit costs even lower. For property managers planning bollard work, combining the project with other site improvements like paving or concrete flatwork maximizes cost efficiency.
How does working in cold climates or during winter conditions affect bollard installation costs?
Working in cold climates or during winter conditions affects bollard installation costs by increasing labor time, material requirements, and scheduling complexity. Concrete footings need cold-weather protection measures such as heated enclosures, insulating blankets, or hot-water mix designs to cure properly below freezing. These precautions add direct material and labor expenses.
Frozen ground also slows excavation significantly, sometimes requiring hydraulic breakers to open footing holes through frost layers. According to the University of Kentucky 2019-2020 Grounds Manual, bollards are removed for the winter at some facilities to facilitate snow removal and maintain emergency access, which means seasonal installations may need to be timed for spring or fall to avoid double mobilization costs. For Colorado properties dealing with freeze-thaw cycles, scheduling bollard work between late spring and early fall avoids the cost premium that winter conditions impose.
Understanding total installation cost helps property managers budget accurately, but long-term bollard performance depends equally on how climate and freeze-thaw cycles affect foundations over time.
How Do Climate and Freeze–Thaw Conditions Affect Long-Term Bollard Performance in Parking Lots?
Climate and freeze–thaw conditions affect long-term bollard performance by degrading concrete footings, corroding steel components, and destabilizing anchoring systems over repeated seasonal cycles. Foundation design, material selection, and maintenance practices all determine how well bollards hold up.
How should bollard foundations be designed to handle snowplows and de-icing chemicals?
Bollard foundations should be designed to handle snowplows and de-icing chemicals by combining impact-resistant geometry with corrosion-resistant materials. Key design considerations include:
- Setback from plow paths. Position bollards far enough from curb lines and drive aisles that plow blades do not clip the posts during routine clearing.
- Concrete mix selection. Specify air-entrained concrete with 5 to 7 percent air content, which resists scaling caused by repeated salt exposure and freeze–thaw cycling.
- Corrosion barriers. Apply epoxy coatings or galvanized finishes to embedded steel pipe sections, since chloride-based de-icers accelerate rebar and pipe corrosion below grade.
- Drainage around footings. Slope surrounding pavement away from the base to prevent salt-laden water from pooling against the footing.
For properties that rely on heavy winter maintenance, these details prevent premature bollard failure far more reliably than replacing damaged posts after the fact.
How does high-altitude freeze–thaw cycling affect concrete footings and bollard anchoring?
High-altitude freeze–thaw cycling affects concrete footings and bollard anchoring by repeatedly expanding moisture trapped in pore structures, which cracks and spalls inadequately protected concrete over time. At elevations common along Colorado’s Front Range, daily temperature swings can push concrete through a freeze–thaw cycle even within a single 24-hour period during spring and fall shoulder seasons.
Footings poured without air-entrained concrete deteriorate fastest. Micro-cracks widen each cycle, loosening the bond between the steel bollard pipe and its concrete encasement. Once that bond weakens, the bollard loses lateral load resistance. Specifying frost-depth-compliant embedment and properly air-entrained mixes at the outset is far less expensive than excavating and re-pouring failed footings later.
What maintenance is needed to protect bollards and surrounding pavement from winter damage?
The maintenance needed to protect bollards and surrounding pavement from winter damage centers on salt removal, sealant preservation, and regular inspections. According to a 2016 parking facility condition appraisal by the University of North Dakota, floor surfaces should be washed bi-annually in the spring to remove salts and other deleterious materials from winter maintenance, and periodic sweeping assists in removing surface-residing chloride residue that shortens the life of sealants and expansion joint systems.
A practical seasonal checklist includes:
- Spring: Power-wash bollard bases and surrounding pavement to flush accumulated de-icing residue.
- Summer: Inspect bollard footings for cracking, spalling, or loosened anchoring; reseal joints between bollard bases and adjacent asphalt or concrete.
- Fall: Touch up protective coatings on steel bollard surfaces before winter exposure begins.
- Winter: Monitor for plow-strike damage after each snow event and document any bollard misalignment.
Consistent seasonal attention preserves both the bollards themselves and the pavement surrounding them, reducing costly emergency repairs. With a maintenance routine established, the next consideration is how bollards coordinate with striping, signage, and overall parking lot design.
How Should You Coordinate Bollards With Striping, Signage, and Overall Parking Lot Design?
You should coordinate bollards with striping, signage, and overall parking lot design by sequencing installation after paving but before final striping, aligning posts with stall markings and crosswalks, and integrating them with lighting and signage to avoid sight-line obstructions.
When in the project timeline should bollard installation happen relative to paving and striping?
Bollard installation should happen after paving is complete but before final striping is applied. This sequence allows concrete footings to cure within the finished pavement surface without disturbing fresh striping layouts. According to a 2015 City of Portsmouth, New Hampshire paving contract, parking lot projects are typically phased so the lot is reclaimed, graded, paved, and striped approximately half at a time, with at least two mobilizations of these activities expected. Bollard footings fit naturally into this phased approach; once the base course and surface course are placed and compacted, crews can core-drill or form bollard holes, pour footings, and backfill before the striping crew arrives. Applying layout paint after bollards are set ensures stall lines, crosswalk markings, and stop bars register precisely to the installed post locations.
How should bollards align with parking stall markings, crosswalks, and stop bars?
Bollards should align with parking stall markings, crosswalks, and stop bars so they reinforce traffic boundaries without encroaching on required clearances. Place bollards at stall-line endpoints or between stalls where they physically separate pedestrian zones from drive aisles. At crosswalks, position posts at the outer edges of the marked crossing to channel vehicles away while preserving the full painted width for pedestrians. Stop bars benefit from bollards set just beyond the bar’s painted edge, reinforcing the stopping point with a physical barrier.
Consistent alignment between paint markings and post locations eliminates driver confusion. When bollards appear disconnected from visible striping patterns, motorists may misjudge lane widths or turning clearances, increasing the risk of low-speed collisions.
How can bollards be integrated with signage, lighting, and other site furnishings without creating hazards?
Bollards can be integrated with signage, lighting, and other site furnishings by maintaining clear sight lines, avoiding clustered obstructions, and coordinating mounting heights. Mount directional or regulatory signs on bollard caps only when the sign face sits above driver eye level and does not block pedestrian visibility at crossings or intersections. Separate bollards from light pole bases by enough distance that maintenance vehicles can access both fixtures independently.
Grouping too many vertical elements in a small area creates visual clutter that obscures wayfinding cues and complicates snowplow or sweeper routes. The most effective layouts treat bollards as one layer within a unified site-furnishing plan, spacing each element so no single zone becomes an obstacle course for drivers, pedestrians, or maintenance crews.
With bollard coordination established, maintaining and repairing these posts keeps the entire system functional over time.
How Do You Maintain, Repair, or Replace Damaged Bollards in a Busy Parking Lot?
You maintain, repair, or replace damaged bollards by assessing structural integrity after each impact, safely extracting compromised posts, patching surrounding pavement, and evaluating whether upgraded bollards are warranted. The following subsections cover safe removal procedures, pavement repair methods, and upgrade decisions.
What is the safest way to remove and replace a struck embedded bollard in existing pavement?
The safest way to remove and replace a struck embedded bollard in existing pavement is to cut away the surrounding surface material first, then excavate the footing without disturbing adjacent pavement structure. A specification from the Town of Belmont, Massachusetts requires the contractor to “cleanly cut away surface pavement to prevent damage to the bollard during removal, excavate as required, and carefully remove any excess material required to cleanly reinstall the bollard in its new location.”
Safe removal in a busy lot follows a consistent sequence:
- Barricade the work zone with traffic cones and signage to redirect vehicles.
- Saw-cut a clean perimeter around the bollard base to isolate the damaged section.
- Extract the bollard and footing using appropriate equipment without cracking adjacent slabs.
- Inspect the hole for utility conflicts before setting the new footing.
- Install the replacement bollard with fresh concrete at the specified PSI rating.
- Restore the surface and allow adequate cure time before reopening.
Replacement costs vary significantly by project. A 2021 City of Half Moon Bay bid summary showed removable bollard remove-and-replace unit prices ranging from $900 to $2,000 per bollard across seven bidders. Scheduling this work during off-peak hours minimizes disruption, though in my experience, the real cost driver is not the bollard itself but the pavement restoration that follows.
How should surrounding asphalt or concrete be repaired after bollard damage?
Surrounding asphalt or concrete should be repaired by evaluating damage beyond the visible impact zone, then patching with proper bonding techniques. Vehicle strikes often crack pavement well past the point of contact; the Texas Department of Transportation notes that “when spalling occurs, the damage often extends beyond the visible spalled area,” making full-extent evaluation essential before cutting repair boundaries.
For asphalt patches, the Tennessee Department of Transportation’s 2024 standard utility repair detail requires a tack coat on all edges of existing asphalt before placing new pavement, with all seams between new and existing surfaces sealed using asphalt tack coat or rubberized crack seal material. Concrete repairs follow a similar principle: saw-cut clean edges, remove deteriorated material completely, and pour new concrete that matches the original mix design. Skipping the tack coat or seam sealing virtually guarantees premature joint failure, especially under parking lot traffic loads. Proper pavement restoration around bollard installations requires the same attention to detail as any commercial parking lot repair. Experienced contractors treat bollard work as an integrated paving and concrete project, coordinating crack sealing, patching, and striping to maintain the integrity of the entire parking surface – not just the area immediately surrounding the post.
When is it better to upgrade to stronger or differently spaced bollards after repeated impacts?
It is better to upgrade to stronger or differently spaced bollards after repeated impacts when existing posts show a pattern of failure at the same location, suggesting the current design cannot absorb typical site-specific forces. The U.S. Nuclear Regulatory Commission’s barrier assessment guidance directs evaluators to “determine if appreciable misalignment, permanent deformation, or concrete/rock spall has occurred” and, if so, perform detailed engineering analysis to confirm the barrier can still resist its design basis threat.
Practical triggers for upgrading include:
- Two or more strikes at the same bollard within 12 months.
- Visible lean, base cracking, or footing displacement after a single moderate-speed impact.
- A change in site use that introduces heavier vehicles, such as delivery trucks replacing passenger cars.
- Repeated damage to pavement surrounding the bollard, indicating insufficient energy absorption.
Closer spacing, larger-diameter steel pipe, deeper footings, or a shift from decorative to concrete-filled security bollards are all viable upgrade paths. The most cost-effective time to make these changes is during the pavement repair that follows an impact, since the ground is already open. Proactive bollard upgrades after damage patterns emerge protect both pedestrians and property far more effectively than simply replacing the same specification again.
How Should Property Managers Choose a Contractor for Parking Lot Bollard Work?
Property managers should choose a contractor for parking lot bollard work by verifying licensing, insurance, relevant commercial experience, and the ability to handle all related site work. The following subsections cover qualifications, single-contractor advantages, and essential questions for estimates.
What qualifications and experience should a bollard installer have for commercial parking lots?
The qualifications and experience a bollard installer should have for commercial parking lots include active state contractor licensing, verified commercial general liability insurance, and documented history completing bollard, concrete footing, and pavement restoration projects at commercial properties.
Key qualifications to verify:
- Active contractor license appropriate for your state (in California, for example, the CSLB requires licensing before a contractor can even submit a bid on projects with labor and materials totaling $1,000 or more).
- Commercial general liability coverage with minimum limits of $1,000,000 per occurrence and $3,000,000 aggregate, covering completed operations and property damage.
- Demonstrated experience with utility locating, concrete footing specifications, and ADA clearance requirements.
- Familiarity with local frost depth conditions and freeze-thaw-resistant concrete mixes.
In my experience, the contractors who cause the most problems on bollard projects are those who understand the steel post but not the pavement system around it. Proper bollard installation is as much a concrete and asphalt project as it is a metalwork task.
Why is it beneficial to use one contractor for bollards, paving, concrete, and striping?
Using one contractor for bollards, paving, concrete, and striping is beneficial because it eliminates coordination gaps between trades, reduces mobilization costs, and ensures the installation sequence protects finished surfaces. When separate contractors handle each trade, scheduling conflicts often lead to bollards installed before pavement has cured, or striping applied before bollard footings are backfilled.
A single-source contractor controls the full timeline: excavation, footing placement, pavement restoration, and final striping happen in the correct order without finger-pointing between vendors. This approach also simplifies warranty accountability, since one company owns the entire scope of work rather than each subcontractor disclaiming responsibility for adjacent elements.
What questions should you ask during estimates and site walks for a bollard project?
The questions you should ask during estimates and site walks for a bollard project focus on site conditions, installation methods, and long-term pavement integrity:
- Will you call 811 and verify all underground utility locations before excavation begins?
- What footing depth and concrete mix specification will you use, and how does it account for local frost depth?
- How will you restore the surrounding asphalt or concrete after footing installation? Oklahoma State University’s bollard installation procedure, for instance, specifies using asphalt cold patch to fill remaining space once the concrete and post are firm and level.
- What is your sequence for bollard installation relative to paving and striping?
- Do you carry completed-operations liability coverage?
- Can you provide references from similar commercial parking lot bollard projects?
Asking these questions reveals whether a contractor understands the full scope of bollard work or views it as a simple post-in-the-ground task. With contractor selection finalized, a full-service paving and concrete partner can integrate bollards seamlessly into the broader parking lot project.
How Should You Approach Parking Lot Bollard Installation With a Full-Service Asphalt and Concrete Contractor?
You should approach parking lot bollard installation with a full-service asphalt and concrete contractor by consolidating footing work, paving, ADA compliance, and striping under one team. This coordination eliminates scheduling gaps and ensures every trade aligns.
How can Asphalt Coatings Company integrate bollard installation with paving, concrete flatwork, ADA work, and striping?
A full-service contractor integrates bollard installation with paving, concrete flatwork, ADA work, and striping by sequencing all trades through coordinated crews. Footings are poured during concrete flatwork, bollard pipes are set before asphalt lifts, and striping follows final curing. According to NAVFAC MIL-HDBK-1013/14, steel bollards for passive vehicle barriers should use 8-inch or 10-inch diameter pipe with 1/2-inch walls, filled with concrete, extending 3 feet above grade from a 4-foot footing, and spaced 2 to 4 feet apart.A qualified contractor handles each of these stages, from subgrade preparation and concrete placement to asphalt paving and ADA-compliant striping, under a single contract.This single-source approach prevents the costly rework that occurs when separate contractors misalign bollard locations with striping layouts or ADA access routes.
What Are the Key Takeaways About Parking Lot Bollard Installation: Footings, Spacing, Permits and Cost We Covered?
The key takeaways about parking lot bollard installation covered in this guide are:
- Footings must extend below local frost depth, typically 3 to 4 feet for embedded steel bollards, with concrete strength of at least 3,000 PSI and air entrainment of 5 to 7 percent in freeze-thaw climates.
- Spacing depends on function: storefront protection requires bollards no more than 5 feet apart on center, while ADA pedestrian access routes need at least 48 inches of clear width between obstructions.
- Permits vary by jurisdiction. Some cities require separate street use permits, zoning reviews, or revocable consent processes that can take months.
- Cost ranges widely, with municipal bid data showing installed unit prices from roughly $522 to $1,210 per bollard depending on size, site conditions, and project volume.
- Climate resilience demands air-entrained concrete, corrosion-resistant coatings, and spring salt removal to protect footings and surrounding pavement.
Choosing a full-service asphalt and concrete contractor ensures that footings, paving, ADA compliance, and striping stay aligned from the first estimate through final inspection.