Commercial asphalt sealcoating is a pavement preservation method that applies a protective emulsion layer over existing asphalt to shield it from ultraviolet radiation, water infiltration, chemical spills, and freeze-thaw damage. A DIY guide pairs with this process by giving property managers the knowledge to evaluate project scope, execute smaller jobs independently, and make informed decisions about when professional service delivers better results.
This guide covers pavement protection fundamentals, pre-project evaluation and step-by-step application, property-specific and climate-driven adjustments, DIY feasibility and safety, maintenance scheduling and budgeting, and post-seal striping with ADA compliance.
Sealcoating extends pavement service life by 3 to 8 years per application cycle and costs a fraction of full reconstruction, making it one of the highest-return investments available for commercial parking lots. Proper material selection and surface preparation are critical; weak asphalt-aggregate combinations and skipped repairs lead to premature stripping rather than protection.
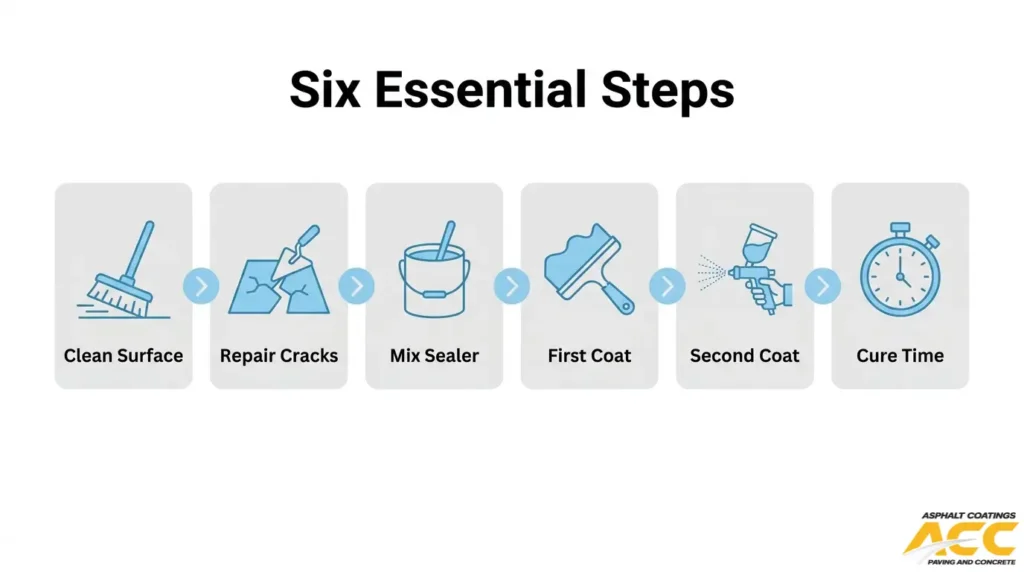
Before any sealer is applied, the surface must be inspected for structural distress, cleaned of debris and oil, and confirmed to meet minimum temperature and moisture requirements. The application process follows a fixed sequence: cleaning, crack and pothole repair, sealer mixing, first coat, second coat, and a 24-to-72-hour cure period before traffic reopens.
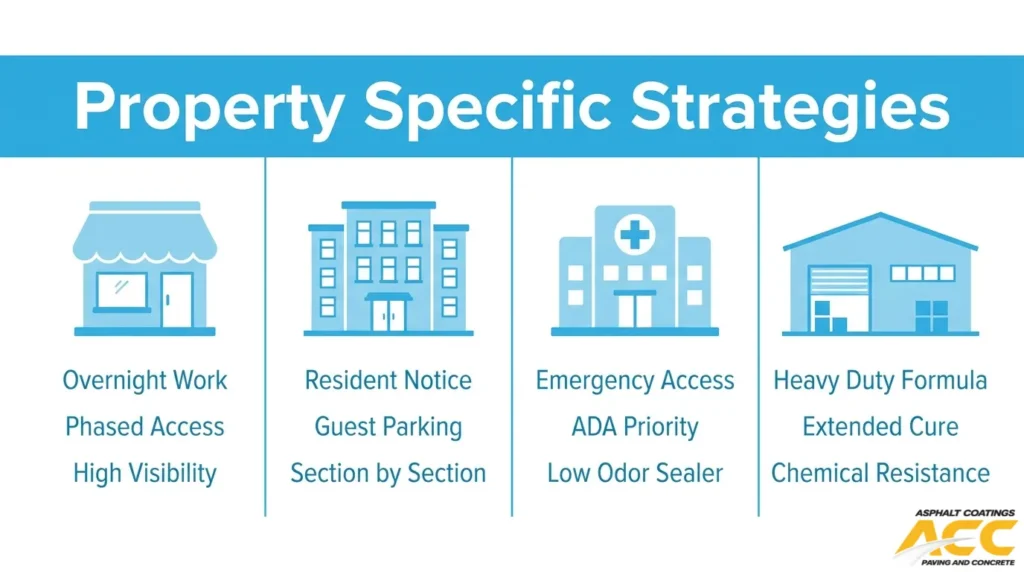
Different commercial properties demand different approaches. Retail plazas require phased overnight scheduling, apartment complexes need resident communication plans, healthcare facilities must maintain emergency access, and industrial lots call for heavy-duty formulations rated for truck traffic and chemical exposure.
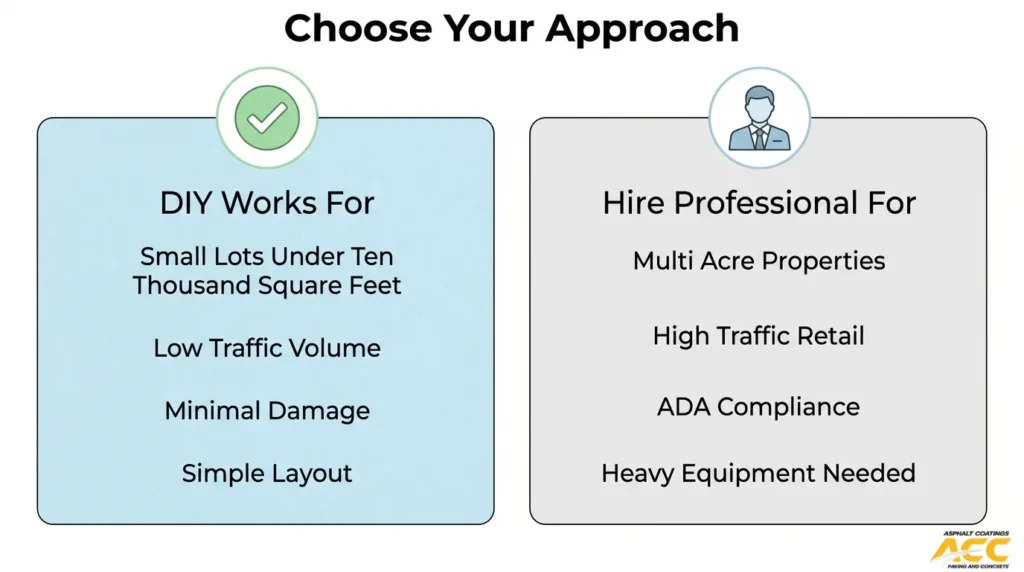
DIY sealcoating works on small, low-traffic lots with minimal structural damage, but larger properties introduce equipment, phasing, safety, and liability complexities that favor professional crews. Climate factors like freeze-thaw cycles, high UV exposure, and deicing salt use directly influence sealer selection, application timing, and recoating frequency. After curing, re-striping must follow ADA scoping requirements for accessible spaces, signage, and slope tolerances.
How Does Commercial Asphalt Sealcoating Protect and Extend Pavement Life?
Commercial asphalt sealcoating protects and extends pavement life by shielding the asphalt binder from ultraviolet rays, water infiltration, and chemical exposure that cause oxidation and structural deterioration. The subsections below cover how sealcoat works as a protective barrier, how much service life it adds, and why the cost comparison with full reconstruction makes it a practical preservation strategy.
Sealcoat is a black, viscous liquid applied to asphalt parking lots, driveways, and playgrounds across North America to protect and enhance the appearance of the underlying pavement. According to the U.S. Geological Survey, this protective coating serves as a barrier between the asphalt binder and environmental stressors that would otherwise break down the pavement surface over time.
The primary threats sealcoating guards against include:
- Ultraviolet radiation, which accelerates oxidation and makes asphalt brittle.
- Water penetration, which erodes the base layer and leads to cracking.
- Chemical spills from fuel and oil, which dissolve the asphalt binder.
- Freeze-thaw cycles, which expand moisture inside small cracks and widen them into structural failures.
By slowing oxidation and raveling, sealcoating preserves the flexible properties of asphalt that allow it to handle traffic loads without cracking prematurely. Each application essentially resets the surface exposure clock, buying the pavement additional years before deeper intervention becomes necessary.
However, material selection and proper application are critical. A Minnesota Department of Transportation Local Road Research Board report found that weak asphalt-aggregate combinations in seal-coat application, combined with increased freeze-thaw cycles, were the main factors for premature stripping of seal-coated pavements. This means a poorly executed sealcoat can actually accelerate failure rather than prevent it, which is why surface preparation and material compatibility deserve serious attention.
The Federal Highway Administration’s Performance Evaluation of Various Rehabilitation and Preservation Treatments found that, based on 13 projects, extended pavement service life from preservation treatments ranges from 3 to 8 years. Individual seal coat applications carry a typical life expectancy of 3 to 5 years before reapplication becomes necessary.
Where the financial case becomes compelling is in the cost comparison. The City of Littleton, Colorado published approximate 2016 bid prices showing seal coating costs roughly $35,000 per lane mile, while complete reconstruction costs approximately $1.3 million per lane mile with a life expectancy of 20 to 25 years. Multiple sealcoat cycles over that same 20-to-25-year window cost a fraction of a single reconstruction.
For most commercial property managers, this makes sealcoating one of the highest-return pavement investments available. The math consistently favors scheduled preservation over deferred maintenance followed by emergency reconstruction, particularly on parking lots that see steady daily traffic.
Understanding how sealcoating protects pavement sets the foundation for evaluating whether your specific lot is ready for application.
What Should You Evaluate Before Starting a Commercial Asphalt Sealcoating Project?
Before starting a commercial asphalt sealcoating project, you should evaluate surface condition, weather requirements, material and equipment needs, and lot-specific planning factors. The following subsections cover each evaluation area.
How Do You Assess the Current Condition of Your Asphalt Surface?
You assess the current condition of your asphalt surface by performing a thorough visual inspection that identifies distress types and their severity before any sealcoat material is applied. According to Ontario County, New York specifications, contractors must “examine pavement surface prior to performing work” and “notify purchasing agency of any adverse or unacceptable conditions that would affect successful repair efforts or application of materials,” with work halted until those conditions are corrected.
Key surface deficiencies to document include:
- Alligator cracking, which signals structural failure beneath the surface layer.
- Linear cracks wider than a quarter inch that require hot-pour filling before sealing.
- Oil stains and chemical spills that prevent proper sealer adhesion.
- Standing water or drainage issues indicating grade problems.
- Oxidized, gray pavement showing UV degradation of the asphalt binder.
Skipping this assessment is one of the most common reasons sealcoat jobs fail prematurely; sealer cannot compensate for underlying structural damage.
What Weather and Temperature Conditions Are Required for Sealcoating?
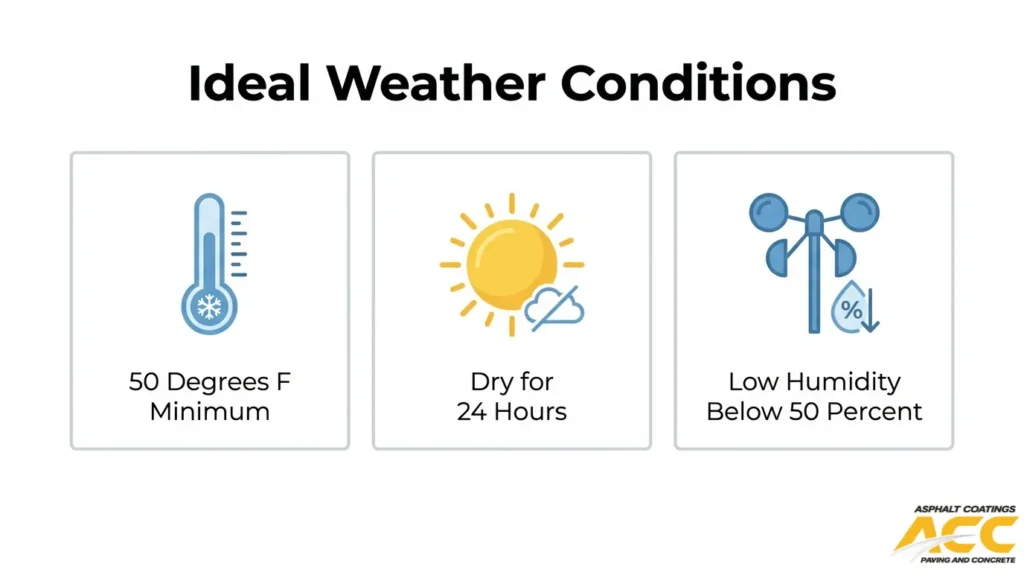
The weather and temperature conditions required for sealcoating are a minimum surface and ambient temperature of 50°F and rising, no forecast drop below 50°F within 24 hours, and dry conditions with no rain expected for at least 24 hours after application.
Additional environmental factors to verify include:
- Humidity below 50% for optimal curing speed.
- Wind speed low enough to prevent uneven sealer drying and overspray.
- No morning dew or residual moisture on the pavement surface.
Because asphalt emulsion sealers cure through water evaporation, cold or damp conditions slow the break process and leave the coating vulnerable to traffic damage. For commercial properties with tight operational schedules, checking a 48-hour weather window before mobilizing crews prevents costly delays and rework.
What Materials, Tools, and Safety Gear Do You Need for Sealcoating?
The materials, tools, and safety gear you need for sealcoating depend on lot size and application method. Essential items fall into three categories:
- Materials: asphalt emulsion sealer, sand or aggregate addite, crack filler, and primer for oil-spot treatment.
- Application tools: spray system or squeegee machine, mechanical agitator or mixing paddle, edging brushes, and barricades for traffic control.
- Safety gear: chemical-resistant gloves, non-slip boots, safety glasses, and respiratory protection.
According to OSHA, controlling exposures to asphalt fumes requires engineering controls, administrative actions, and personal protective equipment. On commercial lots, respiratory protection becomes especially important when using spray application systems in enclosed or low-wind areas. Having all materials staged and inspected before the project start date eliminates mid-job interruptions that compromise coating quality.
How Do Commercial vs. Small Parking Lots Change Your Project Plan?
Commercial versus small parking lots change your project plan by requiring phased traffic control, specialized heavy equipment, and ADA compliance coordination that smaller lots typically do not demand.
Key differences include:
- Equipment scale: Large lots need truck-mounted spray systems and mechanical agitators, while small lots can use squeegee carts or hand-operated sprayers.
- Traffic phasing: Multi-acre commercial properties require sectioned closures so businesses maintain partial access during the project.
- ADA requirements: According to the U.S. Access Board, resurfacing or resealing projects that add new parking spaces constitute alterations and must include accessible spaces per the scoping table.
- Crew size: Large commercial lots typically require dedicated paving, surfacing, and tamping equipment operators working in coordinated teams.
For most commercial properties, these added planning layers make professional oversight essential even when property managers handle smaller maintenance tasks in-house.
With evaluation complete, the next step is executing the sealcoating process itself.
What Are the Main Steps in the Commercial Asphalt Sealcoating Process?
The main steps in the commercial asphalt sealcoating process are surface cleaning, crack and pothole repair, sealer mixing, first coat application, second coat application, and curing. Each step builds on the previous one to ensure a durable, long-lasting seal.
How Do You Clean and Prepare an Asphalt Surface Before Sealcoating?
You clean and prepare an asphalt surface before sealcoating by removing all debris, dirt, oil stains, and vegetation from the pavement. Power sweeping or blowing clears loose material, while oil spots require degreaser treatment so the sealer bonds properly.
Key preparation steps include:
- Power sweep or blow the entire lot to remove sand, gravel, and loose debris.
- Treat oil and fuel stains with a commercial-grade degreaser or primer.
- Remove vegetation growing through cracks or along pavement edges.
- Trim back any landscaping that encroaches onto the surface.
Skipping surface preparation is one of the fastest ways to cause premature sealer failure. Even a thin layer of dust can prevent proper adhesion, so this step deserves more time than most property managers expect.
How Do You Repair Cracks and Potholes Before Applying Sealer?
You repair cracks and potholes before applying sealer by filling them with appropriate patching materials so the sealcoat bonds to a sound, uniform surface. Crack sealing uses hot-pour rubberized sealant for cracks wider than a quarter inch, while smaller hairline cracks can be addressed by the sealcoat itself.
Pothole repair requires cutting out damaged asphalt, compacting the base, and filling with hot-mix or cold-mix asphalt patch. All repairs should be flush with the surrounding pavement. Applying sealer over unrepaired damage traps moisture beneath the coating, which accelerates deterioration through freeze-thaw cycles. Completing structural repairs first ensures the sealcoat performs as a protective layer rather than a cosmetic cover over existing problems.
How Do You Mix and Stage Commercial Asphalt Sealer for Application?
You mix and stage commercial asphalt sealer for application by thoroughly agitating the material and positioning equipment for efficient lot coverage. According to the California Department of Transportation, parking area seal is the application of a mixture of asphaltic emulsion, aggregate, polymer, and water to parking areas.
Proper mixing and staging steps include:
- Mechanically agitate the sealer tank for a minimum of 15 to 20 minutes before use.
- Add water, sand aggregate, and additives per the manufacturer’s specified ratios.
- Position spray rigs or squeegee machines at the lot’s farthest point from the exit.
- Stage enough material to complete full sections without stopping mid-application.
Inconsistent mixing produces uneven coverage and weak spots across the finished surface.
How Do You Apply the First Coat of Asphalt Sealer on a Commercial Lot?
You apply the first coat of asphalt sealer on a commercial lot by working from the farthest point toward the exit using overlapping passes with a spray system or squeegee. The first coat penetrates the oxidized asphalt surface, creating the bond layer that anchors the entire sealcoat system.
Even, consistent coverage at the manufacturer’s recommended spread rate is critical. According to research from the University of Minnesota’s Local Technical Assistance Program, the interface and shear bond strength between the seal-coat layer and the asphalt pavement layer decreased with the increase of freeze-thaw cycles. This makes proper first-coat adhesion especially important in climates with seasonal temperature swings. Edges, curb lines, and areas around utility covers typically require hand-applied detail work with brushes or smaller squeegees.
When and How Do You Apply a Second Coat for Added Protection?
A second coat is applied after the first coat has dried to the touch, typically four to eight hours depending on temperature and humidity. The second coat adds thickness, improves UV resistance, and creates a more uniform, finished appearance across the commercial lot.
Application technique mirrors the first coat: work from the far end toward the exit using consistent, overlapping passes. Applying the second coat perpendicular to the first coat’s direction helps fill any thin spots or missed areas. For high-traffic commercial lots, two coats are standard practice rather than optional. A single coat may suffice for low-traffic areas, but most parking lots benefit from the added durability that two properly applied coats provide.
How Long Does Asphalt Sealer Need to Cure Before Reopening to Traffic?
Asphalt sealer needs to cure for a minimum of 24 to 48 hours before reopening to vehicle traffic, though full curing can take up to 72 hours in cooler or humid conditions. Pedestrian traffic should stay off the surface for at least 24 hours.
Factors that affect cure time include:
- Ambient and surface temperature (warmer conditions accelerate curing).
- Humidity levels (high humidity slows water evaporation from the emulsion).
- Number of coats applied (two coats require longer total cure time).
- Air circulation and direct sunlight exposure across the lot.
Reopening too early causes tire scuffing, tracking marks, and permanent surface damage that compromises the seal’s longevity. Planning the cure window into your project schedule, especially for phased commercial lots, prevents costly rework.
With curing complete, the surface is ready for re-striping and pavement markings to restore traffic flow.
How Does the Sealcoating Process Differ for Various Commercial Properties?
The sealcoating process differs for various commercial properties based on traffic volume, operational hours, surface wear patterns, and tenant or occupant needs. The subsections below cover specific approaches for shopping centers, apartment complexes, healthcare facilities, and industrial lots.
How Should You Approach Sealcoating for Shopping Centers and Retail Plazas?
You should approach sealcoating for shopping centers and retail plazas by scheduling work in phases that keep storefronts accessible to customers at all times. Retail properties depend on continuous foot traffic and vehicle turnover, so closing an entire lot simultaneously risks revenue loss for tenants.
Key considerations for retail sealcoating include:
- Completing work in overnight or early-morning shifts before peak shopping hours.
- Phasing the project by zones so at least half the parking remains open during each stage.
- Coordinating with tenant lease agreements that may specify access requirements.
- Prioritizing high-visibility entrance lanes first, since fresh sealcoat improves curb appeal immediately.
For properties with drive-through lanes or loading docks, those areas need separate scheduling windows to avoid disrupting deliveries. Retail plazas benefit most from a proactive phasing plan developed weeks before the crew arrives.
How Should You Approach Sealcoating for Apartment and HOA Parking Lots?
You should approach sealcoating for apartment and HOA parking lots by providing residents with clear advance notice and designated temporary parking. Unlike retail properties, apartment lots serve the same vehicles 24 hours a day, which makes phased closures more personal and disruptive to daily routines.
Effective strategies include:
- Issuing written notices at least 7 to 14 days before work begins.
- Assigning overflow parking in nearby guest areas or coordinating with neighboring properties.
- Sealcoating one building section at a time so affected residents can relocate vehicles to completed zones.
- Scheduling around lease turnover periods when occupancy may temporarily dip.
HOA boards should also account for ADA-accessible spaces. According to the U.S. Access Board, resurfacing or resealing projects that add new parking spaces constitute alterations and must include accessible spaces as required in the scoping table. Resident communication is the single biggest factor separating a smooth apartment sealcoating project from a complaint-filled one.
How Should You Approach Sealcoating for Healthcare and Medical Facilities?
You should approach sealcoating for healthcare and medical facilities by treating uninterrupted patient access as the top scheduling constraint. Emergency entrances, ambulance lanes, and handicap-accessible routes must remain fully functional throughout the project.
Critical planning steps include:
- Mapping every emergency vehicle route and ensuring zero overlap with active work zones.
- Maintaining all ADA-accessible parking spaces or providing compliant temporary alternatives at equivalent proximity to entrances.
- Working during low-census hours, typically nights and weekends, to minimize patient and staff disruption.
- Using low-odor, asphalt-based sealers near ventilation intakes to reduce fume exposure in clinical environments.
Healthcare properties also require close coordination with facility management teams who understand shift schedules, delivery windows, and emergency protocols. Any sealcoating plan that forces patients to walk longer distances or blocks emergency access, even briefly, is unacceptable. This property type demands the most rigorous pre-project communication of any commercial category.
How Should You Approach Sealcoating for Industrial and Heavy-Use Lots?
You should approach sealcoating for industrial and heavy-use lots by selecting heavier-duty sealer formulations and addressing structural damage before application. Industrial lots endure forklift traffic, loaded semi-trucks, and chemical spills that standard commercial parking areas never experience.
Key differences for industrial sealcoating include:
- Repairing deep ruts, oil-saturated areas, and base failures before any sealer is applied, since cosmetic coating over structural problems wastes material.
- Specifying aggregate-reinforced or polymer-modified sealers that resist abrasion from heavy axle loads.
- Coordinating with warehouse and shipping managers to phase work around loading dock schedules.
- Allowing extended cure times before permitting heavy vehicle traffic, often 48 hours or more compared to the standard 24-hour minimum.
Industrial facilities also face higher exposure to petroleum drips and hydraulic fluid leaks that compromise adhesion. Pre-treating contaminated areas with a primer or degreaser is essential. For properties managing both light vehicle and heavy truck zones, treating them as separate projects with different material specifications produces significantly better long-term results.
With property-specific strategies in place, understanding key DIY considerations helps determine when professional support is the better path.
What Are the Key DIY Considerations for Commercial Asphalt Sealcoating?
The key DIY considerations for commercial asphalt sealcoating include project scope limits, common application mistakes, traffic management, and safety liability. The following sections cover when DIY is reasonable, errors to avoid, phasing strategies, and protective measures.
When Is DIY Commercial Sealcoating Reasonable for Property Owners?
DIY commercial sealcoating is reasonable for property owners managing small lots with low traffic volumes and minimal structural damage. Lots under 10,000 square feet, such as small office parks or church parking areas, are the most practical candidates for self-application using squeegee or hand-spray methods.
Larger commercial properties introduce complexity that quickly exceeds DIY capability:
- Multi-acre retail lots require spray rigs and bulk material staging.
- High-traffic facilities need professional phasing plans to avoid business disruption.
- Lots with significant cracking or base failure demand structural repair before sealing.
For most commercial properties, the equipment investment and labor coordination alone make professional service the more cost-effective choice. DIY sealcoating works best as a maintenance touch-up strategy for owners who already have sound pavement and simple layouts.
What Are the Most Common DIY Sealcoating Mistakes to Avoid?
The most common DIY sealcoating mistakes to avoid are improper surface preparation, incorrect mixing ratios, applying sealer in unsuitable weather, and failing to allow adequate cure time between coats.
- Skipping thorough cleaning leaves oil stains and debris that prevent sealer adhesion.
- Over-diluting or under-mixing the emulsion creates inconsistent coverage and premature wear.
- Applying too thick a coat traps moisture underneath, causing peeling and flaking within months.
- Ignoring temperature thresholds results in sealer that never cures properly on the pavement surface.
- Reopening to traffic too early leaves tire marks and scuffs that compromise the protective layer.
Each of these errors shortens the seal coat’s effective lifespan and often costs more to correct than the original professional application would have.
How Can You Plan Traffic Control and Phasing for a DIY Project?
You can plan traffic control and phasing for a DIY project by dividing the lot into workable sections, sealing one zone at a time, and using proper signage to redirect vehicles and pedestrians safely. According to a 2023 Federal Highway Administration Federal Register notice, the provisions of the MUTCD establish a national standard for traffic control devices on all public roads open to public travel.
Key phasing steps include:
- Map the lot into two or more zones that allow continued access to building entrances.
- Place cones, barricades, and directional signs before work begins each day.
- Seal one zone completely and allow full cure before opening it and closing the next.
- Coordinate with tenants or building management on a schedule that minimizes peak-hour disruption.
Even on private commercial lots, following MUTCD-aligned signage practices protects against liability if a pedestrian or driver is injured in the work zone.
What Safety and Liability Issues Should DIY Sealcoaters Consider?
The safety and liability issues DIY sealcoaters should consider include chemical exposure risks, slip-and-fall hazards during application, and premises liability for anyone injured on the property during the project.
Sealcoat products contain volatile compounds that produce harmful fumes. According to OSHA, controlling exposures to asphalt fumes can be done through engineering controls, administrative actions, and personal protective equipment (PPE). At minimum, DIY applicators need:
- Chemical-resistant gloves and eye protection
- Respirators rated for organic vapors
- Non-slip footwear for wet-surface work
- Long sleeves and pants to prevent skin contact
From a liability standpoint, property owners assume full responsibility for worksite safety when performing DIY sealcoating. Any customer, tenant, or visitor who slips on wet sealer or inhales fumes on your property could file a premises liability claim. Carrying adequate general liability insurance and posting clear warning signage are essential protective measures.
Understanding these risks helps property owners decide when professional sealcoating contractors offer not just better results, but also meaningful liability protection.
How Do Climate and Local Conditions Affect the Sealcoating Process?
Climate and local conditions affect the sealcoating process by altering cure times, application windows, and recoating frequency. Freeze-thaw cycles, UV exposure, and deicing salts each demand specific adjustments covered below.
How Does a Freeze–Thaw Climate Affect Sealcoating Timing and Frequency?
A freeze-thaw climate affects sealcoating timing and frequency by narrowing the viable application window and accelerating seal coat deterioration. Water infiltrates micro-cracks, freezes, expands, and breaks the bond between the seal coat layer and the underlying pavement. According to a Minnesota Department of Transportation Local Road Research Board report, weak asphalt-aggregate combinations in seal coat application and increased freeze-thaw cycles were the main factors for premature stripping of many seal coat asphalt pavements.
Properties in freeze-thaw regions should plan sealcoating for late spring through early fall, when overnight temperatures reliably stay above 50°F. More frequent reapplication, often every two to three years, helps maintain protection before winter damage compounds.
How Does High UV Exposure Change Your Sealcoating Strategy?
High UV exposure changes your sealcoating strategy by accelerating oxidation and binder breakdown in asphalt surfaces. Prolonged ultraviolet radiation dries out the oils in asphalt, causing brittleness, surface raveling, and fading. A 2025 study published in Materials (Basel) found that UV aging at 180 hours followed by thermal-oxygen aging at 120 hours produced the greatest impact on asphalt mixture degradation.
In high-altitude or sun-intensive regions, sealcoating serves as a critical UV barrier. Applying sealer on the shorter end of the maintenance cycle, roughly every two to three years, prevents oxidation from reaching the structural binder layer. Scheduling application during moderate temperatures rather than peak summer heat also improves cure quality and film uniformity.
How Should You Adjust Sealcoating for Areas With Snow and Deicing Salts?
You should adjust sealcoating for areas with snow and deicing salts by applying sealer well before winter and selecting formulations that resist chemical exposure. According to the University of Minnesota Extension, excessive use of deicing salts can degrade concrete, asphalt, and natural stone, and corrode metals. Salt residue left on unsealed pavement accelerates surface erosion and amplifies freeze-thaw damage.
Key adjustments for snow-belt properties include:
- Schedule sealcoating in late summer or early fall so the coat fully cures before the first freeze.
- Power-wash all salt residue from the surface before applying any sealer.
- Use a polymer-modified sealer for improved chemical and abrasion resistance.
- Plan reapplication every two to three years to replace the protective barrier worn by plows and salt.
Understanding how climate shapes your sealcoating schedule makes it easier to set the right long-term maintenance frequency.
How Often Should Commercial Asphalt Be Sealcoated and Maintained?
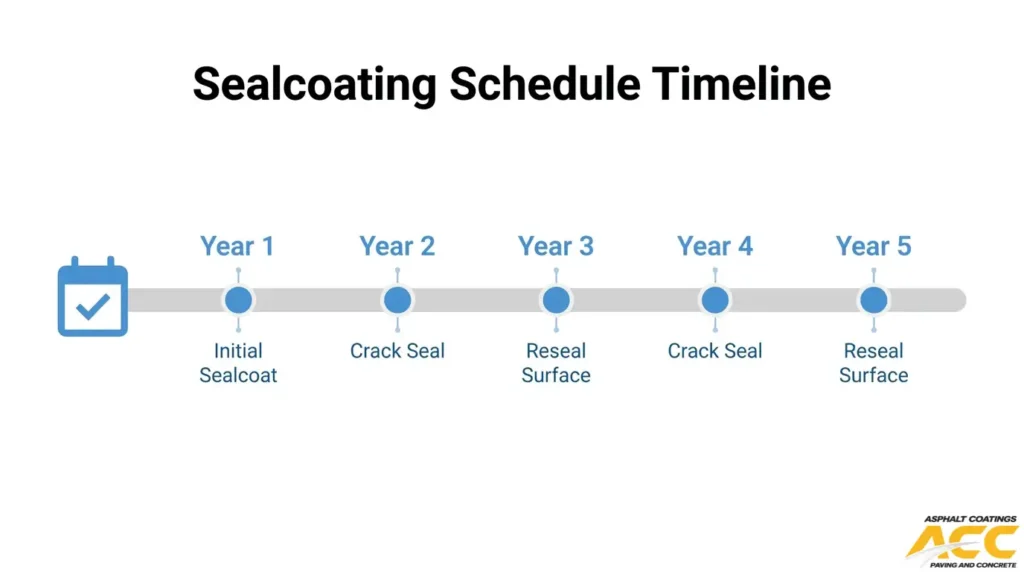
Commercial asphalt should be sealcoated every 2 to 5 years, depending on traffic volume, climate exposure, and pavement condition. The sections below cover how usage levels affect frequency, how to coordinate crack sealing with sealcoating, and how routine maintenance delays costly replacement.
How Do Usage Levels and Traffic Types Affect Sealcoating Frequency?
Usage levels and traffic types affect sealcoating frequency by accelerating surface wear at different rates. High-traffic commercial lots serving heavy delivery trucks, buses, or constant customer turnover degrade sealcoat faster than low-traffic office parking areas. Lots with frequent turning movements, such as drive-throughs and loading docks, experience concentrated abrasion that shortens the protective layer’s effective life.
Key factors that increase sealcoating frequency include:
- Heavy vehicle loads from box trucks, semi-trailers, or waste haulers.
- High daily traffic counts exceeding several hundred vehicle passes.
- Frequent turning, braking, and idling in confined areas.
- Chemical exposure from fuel drips, hydraulic fluid, or oil leaks.
Light-use lots with mostly passenger vehicles can often extend cycles to 4 or 5 years, while industrial and retail lots with heavy or constant traffic typically need resealing every 2 to 3 years. Matching your sealcoating schedule to actual usage prevents both premature reapplication and costly neglect.
How Do You Coordinate Crack Sealing and Sealcoating Over Time?
You coordinate crack sealing and sealcoating over time by treating crack sealing as the first line of defense and scheduling sealcoating after all crack repairs have fully cured. Cracks allow water to penetrate the asphalt base, so sealing them before applying a sealcoat ensures the protective layer bonds to a sound surface.
A practical coordination sequence includes:
- Inspect the pavement annually for new cracks, especially after winter.
- Perform hot-pour or cold-pour crack sealing on all visible cracks.
- Allow crack sealant to cure fully, typically 24 to 48 hours.
- Apply sealcoat over the repaired surface during the next scheduled cycle.
Staggering these treatments maximizes each product’s lifespan. Crack sealing can be performed in off-cycle years between sealcoat applications, keeping water out of the subbase year-round. This layered approach is one of the most cost-effective ways to protect commercial pavement without overlapping unnecessary work.
How Can Routine Maintenance Help You Delay Major Asphalt Replacement?
Routine maintenance helps you delay major asphalt replacement by addressing small deterioration before it compounds into structural failure. According to the Federal Highway Administration’s Performance Evaluation of Various Rehabilitation and Preservation Treatments, extended pavement service life from preservation treatments ranges from 3 to 8 years across 13 evaluated projects.
Maintenance activities that extend pavement life include:
- Sweeping debris and clearing drain inlets to prevent standing water.
- Filling cracks annually before they widen into alligator cracking.
- Sealcoating on a regular cycle to block UV oxidation and water infiltration.
- Patching potholes and localized failures promptly.
Without these interventions, minor surface issues escalate into base failures that require full-depth removal and reconstruction. For most commercial properties, a consistent maintenance program costs a fraction of replacement while keeping the lot functional and safe for years longer than neglected pavement. Proactive scheduling turns maintenance from an expense into a long-term savings strategy.
With a maintenance timeline in place, understanding cost factors helps you budget each cycle effectively.
What Are the Cost Factors and Budget Considerations for Sealcoating?
The cost factors for sealcoating include lot size, layout complexity, material type, number of coats, and whether you hire a professional or attempt DIY. The following sections break down how each factor influences your total project budget.
How Do Lot Size and Layout Influence Commercial Sealcoating Costs?
Lot size and layout influence commercial sealcoating costs by directly determining material volume, labor hours, and equipment requirements. Larger lots benefit from economies of scale; the per-square-foot price typically drops as total area increases because mobilization and setup costs are spread across more surface.
Layout complexity adds cost in several ways:
- Tight corners, islands, and landscaped medians require hand-squeegee work instead of spray application.
- Multiple access points demand phased closures, extending labor time.
- Irregular shapes increase material waste from edge trimming and overlap.
- Heavy striping areas (fire lanes, ADA zones, directional arrows) need careful masking before sealer application.
A simple rectangular lot with open lanes is the most cost-efficient layout to sealcoat. For property managers budgeting a project, requesting a per-square-foot quote alongside a flat bid helps compare proposals accurately.
How Do Material Types and Number of Coats Affect Price?
Material types and number of coats affect price through differences in raw material cost, coverage rate, and application labor. Coal-tar-based sealers and asphalt-based sealers represent the two primary options, each carrying different price points and performance characteristics.
Key pricing factors by material and coat count:
- Coal-tar sealers generally cost more per gallon but offer stronger resistance to fuel spills and UV degradation.
- Asphalt emulsion sealers are often less expensive upfront, though they may require more frequent reapplication.
- A single coat provides baseline protection, while two coats increase material cost by roughly 40–60% but significantly extend service life.
- Additives like sand aggregate or polymer modifiers raise per-batch cost yet improve traction and durability.
For most commercial lots, two coats deliver the best long-term value because they reduce reapplication frequency, which offsets the higher initial material expense.
How Do DIY Sealcoating Costs Compare With Professional Service Costs?
DIY sealcoating costs compare with professional service costs favorably on material price alone, but the total project expense often narrows once equipment, time, and risk are factored in.
According to the City of Littleton, Colorado, sealcoating costs approximately $35,000 per lane mile at 2016 bid prices, while a complete reconstruction runs approximately $1.3 million per lane mile. That gap highlights why sealcoating, even professionally applied, remains one of the most cost-effective pavement preservation strategies.
DIY projects save on labor but introduce hidden costs:
- Equipment rental (sprayers, squeegees, blowers) adds several hundred dollars per day.
- Improper application thickness or missed curing windows can cause premature failure, requiring costly reapplication.
- Liability exposure for slip-and-fall incidents during curing falls on the property owner.
For lots under a few thousand square feet with simple layouts, DIY can be practical. Larger commercial properties almost always see better per-square-foot value from professional crews who bring calibrated equipment and trained applicators.
Understanding these budget dynamics helps property managers weigh upfront savings against long-term pavement performance when planning their next sealcoating cycle.
How Can You Re-Stripe and Re-Mark a Parking Lot After Sealcoating?
You can re-stripe and re-mark a parking lot after sealcoating by waiting for full cure, following ADA scoping requirements, and designing a layout that optimizes traffic flow. The sections below cover timing, compliance, and layout strategy.
When Can You Safely Stripe and Add Pavement Markings After Sealcoating?
You can safely stripe and add pavement markings after sealcoating once the sealer has fully cured, which typically requires 24 to 48 hours under favorable conditions. Applying traffic paint or thermoplastic markings to uncured sealer causes smearing, poor adhesion, and premature line failure.
Key conditions to confirm before striping include:
- The surface is dry and firm to the touch with no tacky residue.
- Ambient and surface temperatures remain above 50°F.
- No rain is forecast for at least 24 hours after line application.
Scheduling striping immediately after the cure window keeps lot closure time to a minimum, which matters greatly for high-traffic commercial properties like retail plazas and medical facilities.
How Do You Ensure ADA-Compliant Striping and Signage After Sealing?
You ensure ADA-compliant striping and signage after sealing by following federal accessibility standards during every restriping project. According to the U.S. Access Board, resurfacing or resealing projects that add new parking spaces constitute alterations and must include accessible spaces as required in the scoping table.
ADA-compliant accessible parking spaces must meet these requirements:
- Each car-accessible space must be at least 96 inches wide.
- Each access aisle must be at least 60 inches wide.
- Slopes cannot exceed 2.08% in any direction.
- Surfaces must be firm, stable, and slip-resistant.
Signage, van-accessible designations, and the number of reserved spaces should be verified against the latest ADA scoping tables before any paint is applied. Overlooking these details during a routine sealcoat project is one of the most common compliance mistakes property managers make.
How Can You Improve Traffic Flow and Safety With New Striping?
You can improve traffic flow and safety with new striping by redesigning lane markings, directional arrows, crosswalks, and stall configurations during the restriping phase. Sealcoating covers all existing lines, creating a blank canvas to correct outdated or inefficient layouts.
Effective restriping strategies include:
- Adding directional arrows and one-way lane markings to reduce conflicts.
- Widening drive aisles in high-turnover areas near building entrances.
- Marking fire lanes, loading zones, and no-parking zones with contrasting colors.
- Installing crosswalk markings at pedestrian paths between buildings and parking rows.
Fresh, high-visibility striping on a newly sealed surface also improves nighttime safety for drivers and pedestrians. For commercial properties with evolving tenant mixes or changing traffic patterns, each sealcoat cycle presents a practical opportunity to rethink the entire lot layout.
With a properly striped lot in place, partnering with an experienced contractor ensures the full sealcoating investment delivers lasting results.
How Should You Approach Commercial Asphalt Sealcoating With a Professional Contractor?
You should approach commercial asphalt sealcoating with a professional contractor by selecting a firm that offers integrated services, from crack sealing through final striping. The sections below cover how Asphalt Coatings Company supports long-term pavement plans and the key takeaways from this guide.
How Can Professional Sealcoating and Crack Sealing From Asphalt Coatings Company Support Your Pavement Plan?
Professional sealcoating and crack sealing from Asphalt Coatings Company support your pavement plan by combining Colorado-specific expertise with a full scope of maintenance services under one roof. Since 1986, Asphalt Coatings Company has delivered sealcoating, crack sealing with CDOT-approved materials, parking lot striping, and ADA-compliant concrete work using in-house crews across the Front Range.
Sealer selection is a critical decision that a qualified contractor handles based on site conditions. According to the Pavement Coatings Technology Council, refined coal tar-based sealers are more resistant to natural aging from sun, rain, and freeze-thaw exposure and are manufactured to the ASTM D490 performance specification. Asphalt Coatings Company evaluates each property’s traffic load, climate exposure, and budget before recommending a sealer type.
For property managers juggling multiple maintenance priorities, having a single contractor coordinate crack sealing, sealcoating, and restriping in the correct sequence eliminates scheduling conflicts and ensures each treatment bonds properly to the one before it.
What Are the Key Takeaways About the Commercial Asphalt Sealcoating Process and DIY Guide We Covered?
The key takeaways about the commercial asphalt sealcoating process and DIY guide are:
- Sealcoating protects asphalt from UV oxidation, water infiltration, and chemical damage, extending pavement service life when applied on a consistent cycle.
- Surface preparation, including cleaning, crack repair, and pothole patching, determines whether the sealer bonds correctly and performs as expected.
- Weather requirements are non-negotiable: temperatures must be at or above 50°F and rising, with no rain forecast for at least 24 hours after application.
- DIY sealcoating is feasible on small lots, but commercial properties with heavy traffic, phased closures, and ADA restriping obligations benefit from professional execution.
- Sealer type, coat count, lot size, and local climate conditions all influence project cost and reapplication frequency.
- Coordinating crack sealing before sealcoating, and restriping after full cure, keeps each treatment effective and compliant.
For commercial properties across Colorado’s Front Range, Asphalt Coatings Company brings 39 years of regional experience to every phase of the sealcoating process.